Last updated: February 24, 2026
Melanoma accounts for only about 1% of skin cancers, but it causes the majority of skin cancer deaths. The good news? When caught early, melanoma has a five-year survival rate exceeding 99%. Learning how to check your skin for melanoma at home gives you the power to detect changes early and seek professional evaluation before a small problem becomes a serious health threat.
Regular self-examination is one of the most effective tools for early melanoma detection. Dermatologists recommend monthly skin checks because you know your body better than anyone else. You're the first person who will notice when a mole changes shape, a new spot appears, or something just doesn't look right. This comprehensive guide walks you through everything needed to establish a practical, thorough routine for examining your skin at home.

To check your skin for melanoma at home, perform a monthly head-to-toe examination using mirrors in good lighting. Look for moles or spots showing the ABCDE warning signs: Asymmetry, irregular Borders, Color variation, Diameter larger than a pencil eraser (6mm), or Evolving changes. Document findings with photos and measurements, and consult a healthcare provider immediately about any concerning changes.
Regular skin self-examination serves as your first line of defense against melanoma. Monthly checks allow you to become familiar with your normal skin patterns and quickly identify changes that warrant professional evaluation[5][6].
Early detection dramatically improves melanoma outcomes. When melanoma is caught in its earliest stage (Stage 0 or Stage I), treatment is typically straightforward and highly successful. However, once melanoma spreads to lymph nodes or other organs, treatment becomes more complex and survival rates decrease significantly.
Key benefits of monthly self-exams include:
The Skin Cancer Foundation recommends performing self-exams monthly, choosing a consistent date that's easy to remember, such as the first day of each month or your birthday date[6]. This consistency helps establish the habit and ensures you don't skip examinations.
Common mistake to avoid: Don't wait until you notice something obviously wrong. Melanoma in its earliest stages may look like a harmless spot. Regular monthly checks help you catch subtle changes before they become obvious problems.
For those with higher risk factors for melanoma, including fair skin, family history, numerous moles, or previous skin cancer, self-examination becomes even more critical. However, melanoma can develop in anyone, regardless of skin tone or sun exposure history.
Setting up for effective skin self-examination requires minimal equipment, most of which you likely already have at home. The right tools make the process thorough and efficient[1][2].
Essential items for skin self-examination:
Optional but helpful items:
Choose a private, comfortable space with good lighting where you can perform the examination without interruption. A bathroom with both natural window light and bright overhead lighting works well for most people[1].
Setup tip: Position your full-length mirror so you can stand comfortably in front of it while holding the hand mirror to view your back. Practice the angle before starting your first examination to find the most effective positioning.
Before beginning regular monthly self-exams, schedule a complete professional skin examination with a dermatologist or healthcare provider. This establishes your baseline and ensures any existing spots are professionally evaluated. Your provider can also demonstrate proper examination technique and answer questions about what to look for[1][3].
Proper preparation makes your skin self-examination more effective and establishes a baseline for future comparisons. Taking time to document your starting point pays dividends in the months and years ahead[1][3].
Preparation steps before your first self-exam:
1. Schedule a professional baseline examination
Visit a dermatologist or healthcare provider for a complete skin check before starting monthly self-exams. This professional evaluation identifies any existing spots that need monitoring or removal and gives you confidence about what's normal for your skin. Ask your provider to point out any moles they want you to watch closely[3].
2. Create a body map
Draw a simple outline of your body (front and back views) or print a body map template. Mark the locations of all moles, birthmarks, and spots you can see. Note approximate size and color. This map becomes your reference document for future examinations.
3. Take baseline photographs
Photograph all existing moles and spots, especially those your healthcare provider flagged for monitoring. Take close-up shots showing detail and wider shots showing location on your body. Date these photos and store them in a dedicated folder. Good lighting and consistent distance improve photo quality for comparison purposes[1].
4. Measure significant moles
Use a small ruler to measure the diameter of larger or irregular moles. Record these measurements on your body map or in a notebook. The 6mm threshold (about the size of a pencil eraser) serves as a reference point, but track any mole larger than 3-4mm.
5. Gather your equipment
Assemble all necessary items in your examination space: mirrors, blow dryer, camera, ruler, body map, and good lighting. Having everything ready makes the process smoother and ensures you won't skip steps.
6. Choose your monthly examination date
Pick a specific day each month that's easy to remember. The first day of the month, your birthday date, or the day after your monthly bills are due all work well. Mark it on your calendar and set a reminder on your phone[6].
7. Learn the ABCDE criteria
Familiarize yourself with the warning signs of melanoma before your first self-exam. Understanding what you're looking for makes the examination more effective. We'll cover the ABCDE method in detail in the next section.
Important consideration: If you have numerous moles (more than 50), focus your detailed documentation on the largest, darkest, or most irregular ones. Photographing every single mole may be impractical, but ensure you capture those most likely to change or cause concern.
For individuals with darker skin tones, melanoma often appears in less common locations like palms, soles, under nails, or in the mouth. Pay special attention to these areas during preparation and subsequent examinations.
The ABCDE method provides a simple framework for identifying potentially dangerous skin changes during your monthly self-examination. This system helps you recognize melanoma warning signs even without medical training[1][2].
Normal moles are symmetrical. If you draw an imaginary line through the middle, both halves match. Melanomas often grow unevenly, creating an asymmetrical shape where one half doesn't mirror the other[1].
How to check: Mentally divide each mole in half vertically and horizontally. If the two halves don't match in shape, size, or thickness, note it as asymmetrical and worth monitoring closely.
Benign moles have smooth, even borders. Melanomas frequently develop irregular, scalloped, or notched edges. The border may appear blurred or fade into surrounding skin rather than having a clear boundary[1][2].
What to look for: Examine the edges of each mole. Borders should be distinct and relatively smooth. Ragged, uneven, or poorly defined edges warrant attention.
Normal moles are typically one uniform color, usually a shade of brown or tan. Melanomas often display multiple colors within the same lesion, including shades of brown, black, red, white, or blue[1][2].
Assessment technique: Look for moles with varied coloring or unusual colors. A single mole containing brown, black, and red areas is more concerning than a uniformly brown mole. Also note any mole that's significantly darker than others on your body.
Melanomas are often larger than 6mm (about the size of a pencil eraser) when diagnosed, though they can be smaller. Any mole larger than 6mm deserves closer attention, especially if it's growing[1][2].
Measurement approach: Use a small ruler to measure suspicious spots. However, don't ignore smaller moles that show other warning signs. Some melanomas are detected when they're quite small, particularly during early self-examination.
Any change in a mole's size, shape, color, elevation, or symptoms (itching, bleeding, crusting) is the most important warning sign. New moles appearing after age 30 also fall into this category[1][2].
Change tracking: This is why monthly self-exams and baseline documentation matter. You need a reference point to identify evolution. Changes occurring over weeks or months are particularly concerning.
Additional warning signs beyond ABCDE:
Beyond ABCDE, dermatologists recommend the Ugly Duckling Rule: look for moles that stand out as different from others on your body. If most of your moles are small and light brown, but one is large and dark, that "ugly duckling" deserves professional evaluation even if it doesn't show classic ABCDE signs[1].
Important note: Not all melanomas follow the ABCDE rules perfectly. Amelanotic melanoma, for example, lacks dark pigmentation and may appear pink or skin-colored. Trust your instincts—if something looks or feels wrong, get it checked professionally.
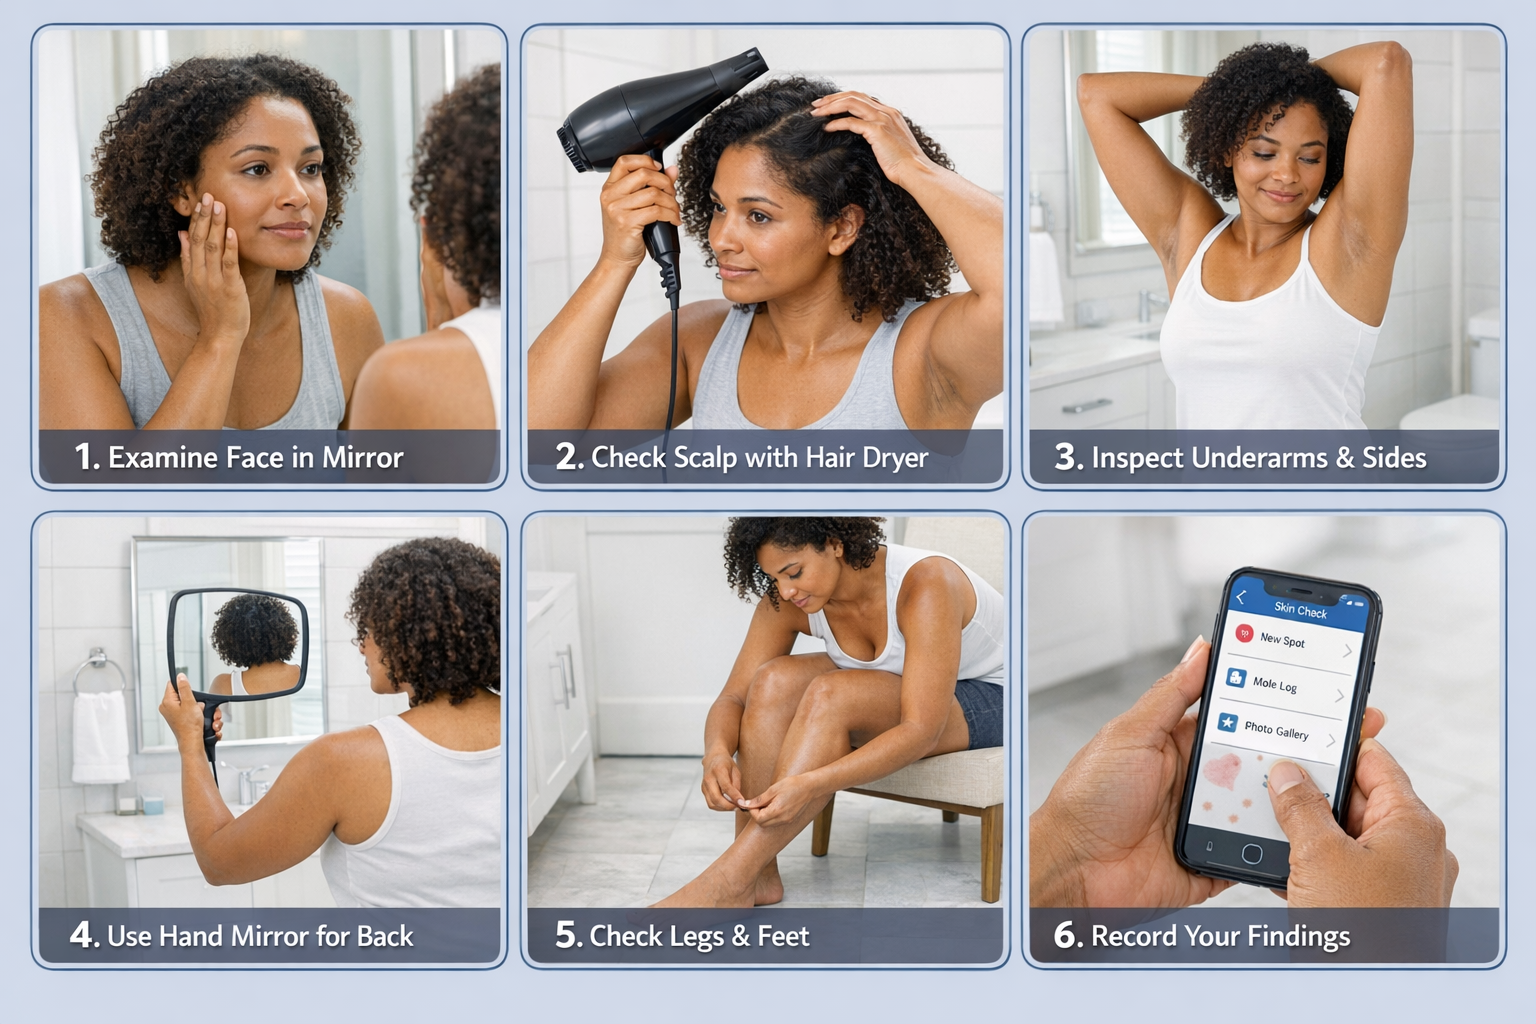
A systematic head-to-toe approach ensures you examine every area of your body during monthly self-checks. Following the same sequence each time prevents you from missing spots and makes the process more efficient[1][5][6].
Complete skin self-examination routine:
Stand in front of your full-length mirror in bright lighting. Examine your face thoroughly, including:
Use your blow dryer and hand mirror to examine your scalp systematically:
Continue standing in front of the mirror:
Check both arms thoroughly:
This requires both mirrors:
Sit on a chair or stool for this section:
Use your hand mirror to check:
After completing your physical examination:
Time-saving tip: Once you establish this routine, the entire process takes 10-15 minutes. The first few examinations may take longer as you familiarize yourself with your skin's baseline appearance.
Common mistake: Don't rush through areas that seem less important. Melanoma can develop anywhere on your body, including areas that receive little sun exposure. Melanoma on the bottom of the foot, for example, is more common than many people realize.
Effective documentation transforms your monthly self-examinations from simple observations into a powerful tracking system that reveals subtle changes over time. Consistent record-keeping helps you and your healthcare provider identify concerning patterns[1][3].
Documentation methods and best practices:
Taking effective comparison photos:
Photo comparison technique: Place previous month's photos side-by-side with current photos on your computer or smartphone screen. This direct comparison makes subtle changes more apparent than relying on memory.
How to measure moles accurately:
Measurement frequency: Measure concerning moles monthly. For stable moles that haven't changed in years, quarterly measurements may suffice.
Creating an effective body map:
What to record in your examination notes:
Sample documentation entry:
Date: March 1, 2026
New findings: Small dark spot on right forearm (3mm, dark brown, flat)
Changes noted: Left shoulder mole #2 appears slightly larger than last month
Measured: 7mm (was 6mm in February)
Action: Schedule dermatologist appointment to evaluate left shoulder mole
Several smartphone applications help organize skin self-examination documentation:
Privacy consideration: If using apps, review privacy policies to understand how your health data is stored and shared. Some people prefer keeping documentation entirely offline for privacy reasons.
Immediate professional evaluation needed if you notice:
Trust your instincts: If something concerns you, even if you can't articulate exactly why, document it thoroughly and schedule a professional evaluation. It's better to have a healthcare provider confirm something is benign than to wait and potentially miss early melanoma.
For concerning findings, consider visiting a specialized skin cancer clinic where providers have extensive experience identifying and treating melanoma.
Finding a suspicious spot during your self-examination can be alarming, but knowing the appropriate next steps helps you respond effectively and avoid unnecessary anxiety[3].
Immediate actions when you identify a concerning spot:
Before doing anything else, create detailed documentation:
This documentation helps your healthcare provider assess the situation and provides a baseline if monitoring is recommended.
Don't wait or adopt a "watch and see" approach if you've identified something that meets ABCDE criteria or otherwise concerns you. Contact your healthcare provider or dermatologist promptly[3].
When calling for an appointment:
Most dermatology offices prioritize appointments for potential skin cancer concerns. If you're told the wait is several weeks or months, explain your specific concerns and ask if an earlier appointment is available.
Resist the temptation to diagnose yourself using internet searches or comparison photos. Many benign skin conditions can mimic melanoma warning signs, and many melanomas don't look like textbook examples. Only a trained healthcare provider can make an accurate diagnosis[3].
Don't attempt home removal: Never try to remove a suspicious spot yourself. If it is melanoma, incomplete removal can complicate treatment and potentially allow cancer cells to spread. Professional evaluation and proper removal with pathology testing is essential.
Bring to your dermatology appointment:
Questions to consider asking:
Your healthcare provider will:
Biopsy types: Depending on the spot's characteristics, your provider may perform a shave biopsy, punch biopsy, or excisional biopsy. The type chosen depends on the lesion's size, location, and level of suspicion[3].
If a biopsy is performed, results typically arrive within 1-2 weeks. Your pathology report will indicate whether the spot is:
If melanoma is diagnosed, your provider will discuss staging, treatment options, and next steps. Early-stage melanoma often requires only surgical removal with clear margins. More advanced cases may need additional treatment.
Waiting for appointments or results can be stressful. Helpful strategies include:
Important perspective: Finding something concerning during self-examination is actually a success story. You've done exactly what monthly checks are designed to do—identify potential problems early when they're most treatable.
For those in the Toronto area seeking expert evaluation, consider consulting with a melanoma specialist who focuses specifically on skin cancer diagnosis and treatment.
While monthly self-examinations are recommended for everyone, certain individuals face higher melanoma risk and may benefit from more frequent checks or additional professional monitoring[5][6].
High-risk groups requiring extra vigilance:
Individuals with 50 or more moles have increased melanoma risk. Those with 100+ moles face even higher risk. More moles mean more opportunities for melanoma to develop and more spots to monitor[6].
Recommendation: Monthly self-exams plus professional full-body skin examinations every 6-12 months, depending on your dermatologist's assessment.
Atypical (dysplastic) moles are larger than average, irregularly shaped, and show varied coloring. Having atypical moles increases melanoma risk, especially if combined with family history[6].
Recommendation: Monthly self-exams with careful attention to atypical moles, plus professional examinations every 3-6 months initially, then annually if stable.
People with fair skin, light hair, blue or green eyes, and those who burn easily face higher melanoma risk. Fair skin contains less melanin, providing less natural protection against UV damage[5][6].
Recommendation: Monthly self-exams and annual professional skin checks, with more frequent professional exams if other risk factors are present.
Anyone who has had melanoma or other skin cancers faces significantly increased risk of developing additional skin cancers. Previous melanoma patients have a 9-fold increased risk of developing another melanoma[6].
Recommendation: Monthly self-exams plus professional examinations every 3-6 months for the first few years after treatment, then at least annually for life.
Having one or more first-degree relatives (parent, sibling, child) with melanoma increases your risk. About 10% of melanoma patients have a family history of the disease[6].
Recommendation: Monthly self-exams starting in your 20s, with professional examinations annually or as recommended by your dermatologist based on family history details.
Individuals with history of severe sunburns, especially during childhood, or those with extensive cumulative sun exposure face elevated risk. Even one blistering sunburn in childhood doubles melanoma risk[5].
Recommendation: Monthly self-exams and annual professional skin checks, with particular attention to sun-exposed areas.
People taking immunosuppressive medications (organ transplant recipients, certain autoimmune disease patients) or those with conditions affecting immune function have increased skin cancer risk[6].
Recommendation: Monthly self-exams plus professional examinations every 3-6 months, as recommended by your healthcare team.
Melanoma risk increases with age, with median age at diagnosis around 65. However, melanoma also affects younger people, making it one of the most common cancers in young adults[5].
Recommendation: Monthly self-exams at all ages, with professional examinations annually starting in your 20s-30s, or earlier if other risk factors are present.
Those who spend significant time outdoors for work or recreation accumulate UV exposure that increases melanoma risk over time[5].
Recommendation: Monthly self-exams with special attention to commonly exposed areas (face, neck, arms, legs), plus annual professional skin checks.
Important note for people with darker skin: While melanoma is less common in individuals with darker skin tones, it's often diagnosed at later stages because both patients and providers may not expect it. People of all skin tones should perform monthly self-examinations, with particular attention to palms, soles, under nails, and mucous membranes where melanoma more commonly appears in darker-skinned individuals[7].
Work with your dermatologist to establish a screening schedule appropriate for your specific risk profile. Factors they'll consider include:
Risk assessment tools: Some dermatology practices use formal risk assessment tools to calculate your melanoma risk score and recommend appropriate screening frequency.
Even well-intentioned self-examinations can miss important findings if common errors aren't avoided. Understanding these pitfalls helps you conduct more effective skin checks[1][5].
Mistakes that compromise examination effectiveness:
The problem: Many people thoroughly check visible areas but neglect spots they can't easily see, like the scalp, back, buttocks, and genital area. Melanoma doesn't discriminate based on visibility—it can develop anywhere[1][5].
The solution: Use mirrors systematically for all hard-to-reach areas. Ask a partner or family member to help examine your scalp and back. Don't skip any body area, no matter how difficult to view.
The problem: Trying to complete your skin check in 3-4 minutes means you'll miss small or subtle changes. Thorough examination requires time and attention[5].
The solution: Set aside 15-20 minutes for your monthly examination. Choose a time when you won't be interrupted or rushed. Quality matters more than speed.
The problem: Checking your skin sporadically—every few months or only when you remember—makes it difficult to identify gradual changes. Consistency is key to effective monitoring[6].
The solution: Choose a specific day each month and stick to it. Set calendar reminders. Make it a routine like paying monthly bills or changing air filters.
The problem: Relying on memory to track changes doesn't work. You can't accurately remember what a mole looked like three months ago without documentation[1].
The solution: Take photos, record measurements, and maintain written notes. Compare current findings with previous documentation each month.
The problem: Dismissing subtle changes because they seem minor or insignificant. Melanoma often starts with small, gradual changes that are easy to rationalize away[2].
The solution: Document and monitor any change, no matter how small. If a change continues over 2-3 months, seek professional evaluation.
The problem: Concentrating examination efforts on face, arms, and legs while giving minimal attention to areas that rarely see sun. Melanoma can develop in sun-protected areas, including between toes, on genitals, and under nails[5].
The solution: Examine every inch of your body with equal attention, regardless of sun exposure history.
The problem: Believing that darker skin tones eliminate melanoma risk. While melanoma is less common in people with darker skin, it occurs in all skin types and is often diagnosed at later stages in non-white populations[7].
The solution: Everyone should perform monthly self-examinations regardless of skin tone. Those with darker skin should pay particular attention to palms, soles, nail beds, and mucous membranes.
The problem: Finding something suspicious but deciding to "watch it for a while" before bothering a doctor. Delays in evaluation can allow melanoma to progress to more advanced stages[3].
The solution: Schedule professional evaluation promptly for any concerning findings. It's better to have a benign spot checked than to delay evaluation of actual melanoma.
The problem: Using internet searches to diagnose spots yourself, then either panicking over benign findings or dismissing actual melanoma because it doesn't match online photos[3].
The solution: Use self-examination to identify changes and potential concerns, but leave diagnosis to healthcare professionals. Don't let internet research delay professional evaluation.
The problem: Performing examinations in dim lighting where subtle color changes and small spots are difficult to see[1][2].
The solution: Use bright, even lighting—ideally natural daylight supplemented with overhead lights. Avoid harsh shadows that obscure details.
The problem: Neglecting to examine under and around fingernails and toenails. Subungual melanoma (melanoma under the nail) accounts for a significant percentage of melanomas in people with darker skin[7].
The solution: Examine all nails carefully during each self-check, looking for dark streaks, color changes, or nail deformities.
The problem: Starting monthly self-exams without first getting a professional baseline examination and documentation. This makes it difficult to know what's normal for your skin[1][3].
The solution: Schedule a complete professional skin examination before beginning regular self-checks. Use this as your baseline for comparison.
Quality check: After completing your examination, ask yourself: "Did I check every area of my body? Did I document any changes? Do I have any concerns that need professional evaluation?" If you answer no to the first question or yes to the last, take appropriate action.
Understanding what early-stage skin cancer looks like can help you avoid the mistake of dismissing concerning findings as harmless.

Starting monthly skin checks is easier than maintaining them consistently over months and years. Building sustainable habits ensures you continue this life-saving practice[6].
Strategies for long-term adherence:
Choose a memorable date: Pick the first day of each month, your birthday date (e.g., the 15th if you were born on June 15), or link it to another monthly routine. Consistency builds habit[6].
Set multiple reminders: Use phone calendar alerts, sticky notes on your bathroom mirror, or reminders in health tracking apps. Set the reminder for a time when you typically have 15-20 minutes of privacy.
Habit stacking makes new routines easier to maintain. Connect your skin check to an established monthly habit:
The existing habit serves as a trigger for the new behavior.
Reduce friction by keeping all examination supplies in one place:
The easier the process, the more likely you'll complete it consistently.
Visual tracking reinforces habit formation:
Seeing your progress motivates continued adherence.
Accountability and assistance improve consistency:
Social support strengthens commitment to health behaviors.
Flexibility prevents abandonment of the routine:
The goal is sustainable practice, not perfection.
Motivation matters for long-term adherence:
Understanding the purpose behind the behavior reinforces commitment.
Combine self-checks with professional monitoring:
Professional examinations complement rather than replace self-checks.
Adapt your routine as circumstances change:
Life changes don't eliminate the need for skin checks—they just require adaptation.
Acknowledge your commitment to this health practice:
Positive reinforcement strengthens habit maintenance.
Long-term perspective: Monthly skin self-examination is a lifelong practice, not a temporary project. Building it into your routine now creates a sustainable health habit that could literally save your life. The small time investment each month pays enormous dividends in early detection and peace of mind.
For those who discover concerning findings during their examinations, knowing where to find expert melanoma care provides reassurance and facilitates prompt treatment.
How long should a skin self-examination take?
A thorough skin self-examination typically takes 10-15 minutes once you're familiar with the routine. Your first few examinations may take 20-25 minutes as you learn the process and establish your baseline. Don't rush—quality matters more than speed.
Can I check my skin for melanoma if I have many moles?
Yes, people with numerous moles should definitely perform monthly self-examinations. Focus on documenting the largest, darkest, or most irregular moles in detail, and watch for any mole that looks different from the others (the Ugly Duckling Rule). Consider professional mole mapping for comprehensive baseline documentation.
What's the difference between a freckle and melanoma?
Freckles are small, flat, uniformly colored brown spots that darken with sun exposure and fade in winter. They're symmetrical with smooth borders. Melanoma typically shows ABCDE warning signs: asymmetry, irregular borders, color variation, diameter over 6mm, and evolving changes. When in doubt, have a professional evaluate any spot that concerns you.
Should I check my skin if I have dark skin?
Absolutely. While melanoma is less common in people with darker skin tones, it occurs in all racial and ethnic groups and is often diagnosed at later stages in non-white populations. Pay particular attention to palms, soles, nail beds, mouth, and other areas where melanoma more commonly appears in darker-skinned individuals.
How do I know if a mole is changing?
This is why documentation matters. Take photos and measurements of concerning moles monthly. Compare current images with previous ones side-by-side. Look for changes in size, shape, color, border, elevation, or symptoms (itching, bleeding). Any change over 2-3 months warrants professional evaluation.
What should I do if I find a suspicious spot?
Document it thoroughly with photos and measurements, then schedule an appointment with a dermatologist or healthcare provider promptly. Don't wait to see if it changes further. Explain your specific concerns when scheduling to potentially get an earlier appointment. Avoid attempting self-diagnosis or home removal.
Can melanoma appear in areas that never see sun?
Yes, melanoma can develop anywhere on your body, including areas with minimal sun exposure like between toes, on genitals, under nails, on the scalp, and inside the mouth. This is why comprehensive head-to-toe examination is important, not just checking sun-exposed areas.
How often should I see a dermatologist for professional skin checks?
For average-risk individuals, annual professional skin examinations are typically recommended. High-risk individuals (personal or family history of melanoma, numerous moles, fair skin, immunosuppression) may need examinations every 3-6 months. Discuss appropriate frequency with your dermatologist based on your specific risk factors.
Is it normal for new moles to appear?
New moles commonly appear during childhood and young adulthood, typically stopping by age 30-40. New moles appearing after age 30, especially if they're growing or changing, deserve professional evaluation. Not all new moles are melanoma, but they should be assessed by a healthcare provider.
What's the Ugly Duckling Rule?
The Ugly Duckling Rule suggests paying attention to moles that look different from others on your body. If most of your moles are small and light brown, but one is large and dark, that "ugly duckling" warrants closer monitoring or professional evaluation, even if it doesn't show classic ABCDE warning signs.
Can I use my smartphone to help with skin checks?
Yes, smartphones are excellent tools for documenting skin examinations. Use your phone's camera to photograph moles, store images in dated folders, and compare photos month-to-month. Several apps are specifically designed for skin self-examination tracking, though simple photo storage works well too.
What if I'm too anxious to check my skin regularly?
Anxiety about skin checks is understandable but remember that early detection dramatically improves outcomes. Start with professional examination to establish your baseline and get reassurance about your current skin health. Consider having a partner help with examinations for support. Focus on the fact that checking your skin is a positive, proactive health behavior that reduces risk through early detection.
Learning how to check your skin for melanoma at home empowers you to take control of your health through early detection. Monthly self-examinations, combined with systematic documentation and appropriate professional follow-up, create a comprehensive approach to melanoma prevention and early intervention.
The process is straightforward: establish your baseline with professional examination, gather simple equipment, learn the ABCDE warning signs, perform systematic head-to-toe checks monthly, document your findings, and seek professional evaluation for any concerning changes. This 15-minute monthly investment could save your life.
Your action plan starting today:
Remember that finding something suspicious during self-examination is a success, not a failure. You've done exactly what monthly checks are designed to do—identify potential problems when they're most treatable. Early-stage melanoma has excellent survival rates, and your vigilance gives you the best chance of catching any problems early.
Don't let perfect be the enemy of good. Even if you miss a month or don't document as thoroughly as planned, resume your routine and continue forward. Consistency over time matters more than perfection in any single examination.
Your skin health is worth 15 minutes of attention each month. Start your routine today, and encourage family members and friends to do the same. Early detection through regular self-examination, combined with professional monitoring and sun protection, provides your best defense against melanoma.
For professional evaluation of concerning findings or expert guidance on establishing your skin monitoring routine, consider consulting with specialists at a dedicated skin cancer clinic where providers focus specifically on melanoma detection and treatment.
[1] How To Do A Skin Self Examination - https://www.aimatmelanoma.org/melanoma-101/early-detection-of-melanoma/how-to-do-a-skin-self-examination/
[2] 8648 Skin Self Exam - https://my.clevelandclinic.org/health/diagnostics/8648-skin-self-exam
[3] Self Checks And Skin Exams - https://www.curemelanoma.org/patient-eng/diagnosing-melanoma/self-checks-and-skin-exams
[5] Skin Exams - https://www.cancer.org/cancer/risk-prevention/sun-and-uv/skin-exams.html
[6] Self Exams - https://www.skincancer.org/early-detection/self-exams/
[7] Check Skin - https://www.aad.org/public/diseases/skin-cancer/find/check-skin