What Happens to the Tissue After My Mole Is Removed?

When a dermatologist removes a mole from your skin, you might wonder about the journey that tissue takes afterward. Understanding what happens to the tissue after my mole is removed can ease anxiety and help patients appreciate the careful medical process that ensures their safety and health. The removed tissue doesn't simply disappear—it embarks on a critical journey through laboratory analysis while the remaining tissue at the removal site begins a fascinating healing process.

This comprehensive guide explains both pathways: the laboratory analysis of the excised mole tissue and the natural healing process occurring at the wound site. Whether you're preparing for mole removal or recovering from the procedure, this article provides essential insights into the medical processes that protect your health.

Key Takeaways

  • Laboratory Analysis: Removed mole tissue is routinely sent to a pathology laboratory for microscopic examination to rule out skin cancer and confirm diagnosis
  • Healing Timeline: The wound site typically heals within 2-4 weeks for surface closure, but complete scar maturation takes approximately one year
  • Two Tissue Pathways: The excised tissue goes to the lab while the remaining tissue at the removal site undergoes natural wound healing and scar formation
  • Procedure Matters: Shave removal heals faster (2-3 weeks) with minimal scarring compared to surgical excision (4-6 weeks) which creates deeper wounds
  • Normal Healing Signs: Redness, rough texture, and mild discomfort are expected during the healing process as your body rebuilds tissue

The Journey of Removed Mole Tissue: Laboratory Analysis

Detailed medical illustration showing the pathology laboratory process for mole tissue analysis, featuring gloved hands placing tissue sampl

Why Mole Tissue Is Sent for Testing

When a healthcare provider removes a mole, the excised tissue doesn't get discarded. Instead, it's carefully preserved and sent to a specialized pathology laboratory for detailed examination. This standard medical practice serves a critical purpose: ruling out skin cancer and confirming the exact nature of the growth [1].

Even when a mole appears completely benign to the naked eye, microscopic analysis can reveal cellular changes invisible during visual examination. This histopathological biopsy represents an essential safety measure that protects patients from undetected skin cancer.

The tissue analysis process helps identify:

  • Benign (non-cancerous) moles: Common nevi with normal cellular structure
  • Atypical moles: Unusual cellular patterns that may require monitoring
  • Melanoma: The most serious form of skin cancer requiring immediate intervention
  • Basal cell carcinoma: A common, slow-growing skin cancer
  • Squamous cell carcinoma: Another type of skin cancer with varying aggressiveness

Understanding the different types of skin lesions helps patients appreciate why laboratory analysis is so important.

The Pathology Process Step-by-Step

The journey of mole tissue through the laboratory follows a precise, standardized protocol:

1. Tissue Preservation 🧪

Immediately after removal, the tissue specimen is placed in a special preservative solution called formalin. This chemical fixative prevents tissue decomposition and maintains cellular structure exactly as it appeared at the time of removal. The container is labeled with the patient's identifying information and details about the removal site.

2. Laboratory Receipt and Processing

Once the specimen arrives at the pathology laboratory, trained technicians log it into their system and begin processing. The tissue undergoes dehydration through a series of alcohol baths, then gets embedded in paraffin wax to create a solid block that can be sliced into extremely thin sections.

3. Microtome Sectioning

A specialized instrument called a microtome cuts the paraffin-embedded tissue into sections just 3-5 micrometers thick—thinner than a human hair. These ultra-thin slices are placed on glass slides for microscopic examination.

4. Staining

The tissue sections receive special stains, typically hematoxylin and eosin (H&E), which color different cellular components. Hematoxylin stains cell nuclei blue-purple, while eosin colors the cytoplasm and connective tissue pink. This contrast makes cellular details visible under the microscope.

5. Microscopic Examination

A board-certified pathologist examines the stained tissue slides under high-powered microscopy. They evaluate:

  • Cell size, shape, and arrangement
  • Nuclear characteristics and abnormalities
  • Growth patterns and tissue architecture
  • Depth of any abnormal cells
  • Margins (whether the entire lesion was removed)

6. Diagnosis and Report

The pathologist prepares a detailed report describing their findings and providing a definitive diagnosis. This report typically reaches the ordering physician within 5-10 business days, though urgent cases may receive expedited processing.

What the Pathology Report Reveals

The pathology report contains technical medical terminology, but it essentially answers critical questions:

Report ElementWhat It Tells YouDiagnosisThe exact type of lesion (benign nevus, dysplastic nevus, melanoma, etc.)MarginsWhether the entire growth was removed with clear edgesDepthHow deeply any abnormal cells extended into the skinCell CharacteristicsSpecific features that determine risk levelRecommendationsWhether additional treatment or monitoring is needed

For patients concerned about atypical moles or potential melanoma, the pathology report provides definitive answers and guides future care decisions.

When Additional Action Is Needed

Sometimes the pathology report reveals findings that require follow-up:

  • Positive margins: If abnormal cells extend to the edge of the removed tissue, additional excision may be necessary to ensure complete removal
  • Melanoma diagnosis: Requires staging, additional testing, and referral to oncology specialists
  • Dysplastic (atypical) nevus: May warrant closer skin monitoring and evaluation of other moles
  • Unexpected findings: Occasionally, what appeared to be a simple mole reveals something entirely different

Patients receiving concerning pathology results should consult with their healthcare provider or visit a specialized skin cancer clinic for expert guidance.

What Happens to the Tissue After My Mole Is Removed: The Healing Process at the Wound Site

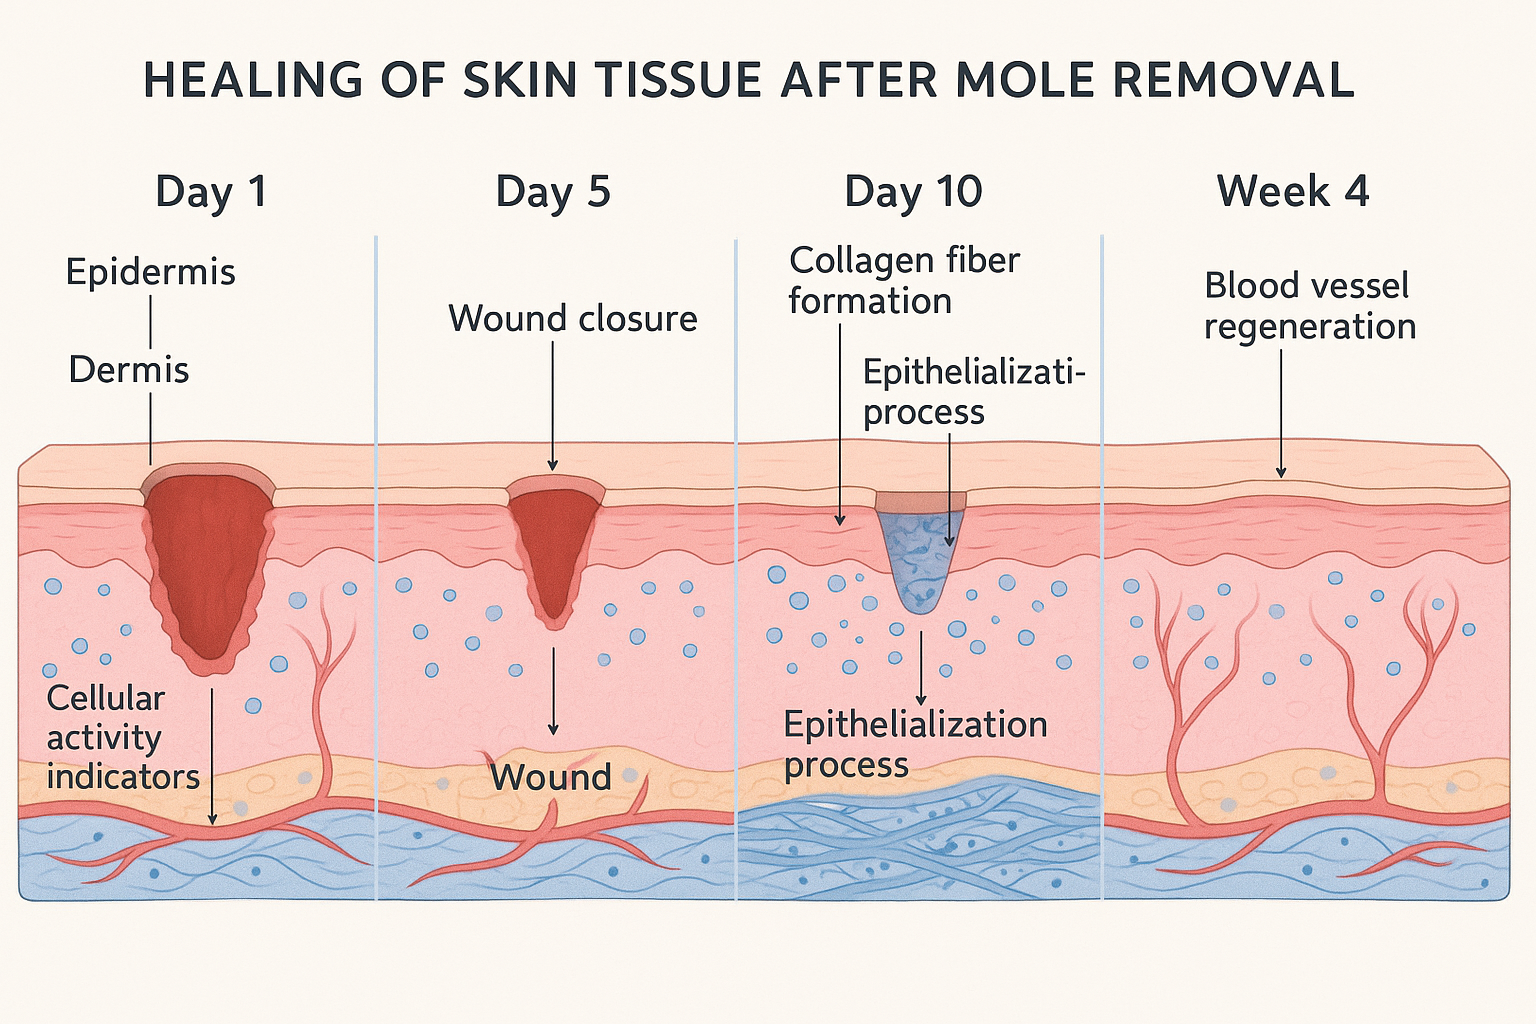
While the excised tissue travels to the laboratory, the tissue remaining at the removal site begins an equally important journey: the natural wound healing process. Understanding this biological response helps patients recognize normal healing versus complications requiring medical attention.

The Body's Immediate Response to Tissue Removal

The moment a mole is removed, your body recognizes the disruption and immediately initiates protective mechanisms:

Blood Clotting 🩸
Within seconds, platelets rush to the wound site and begin forming a clot. This natural bandage stops bleeding and creates a protective barrier against infection. The clot eventually forms a scab that shields the healing tissue beneath.

Inflammation Phase
During the first few days after removal, the wound area may experience:

  • Redness around the site
  • Mild swelling
  • Warmth to the touch
  • Stinging or burning sensations [6]

These symptoms represent the body's inflammatory response—a normal and necessary part of healing. White blood cells flood the area to prevent infection and begin cleaning cellular debris from the wound.

Timeline: What Happens to the Tissue After My Mole Is Removed Week by Week

The healing process follows a predictable timeline, though individual variation occurs based on factors like removal method, location, and personal healing capacity.

Week 1: Initial Healing

  • The wound surface begins closing as epithelial cells migrate across the gap
  • A protective scab forms and hardens
  • Mild discomfort, redness, and swelling peak then gradually decrease
  • For shave removals, surface healing is already well underway

Weeks 2-4: Epithelialization and Tissue Rebuilding

  • Complete surface closure typically occurs during this period [7][13][17]
  • New skin cells cover the wound surface (epithelialization)
  • The scab loosens and eventually falls off naturally
  • Underneath, new tissue appears pink or red and may feel rough or textured [13]
  • Collagen production accelerates as the body builds structural support

The timeline varies by removal method:

  • Shave removal: 1-2 weeks for complete surface closure [17]
  • Surgical excision: 2-4 weeks for full epithelialization [17]

Months 2-3: Scar Formation Begins

  • The wound surface has closed, but healing continues beneath
  • Scar tissue formation becomes visible as the body replaces damaged tissue [11]
  • The area remains red or pink as blood vessels support active healing [3]
  • Texture may feel firm or slightly raised
  • Stitches from surgical excision are typically removed during this period

Months 4-12: Scar Maturation

  • The dermis (deeper skin layer) undergoes extensive remodeling [9]
  • Collagen fibers reorganize into more organized patterns
  • Redness gradually fades to pink, then eventually to skin tone or slightly lighter
  • Scar texture softens and flattens
  • Full scar maturation completes around the one-year mark [9]

Differences Between Removal Methods and Tissue Healing

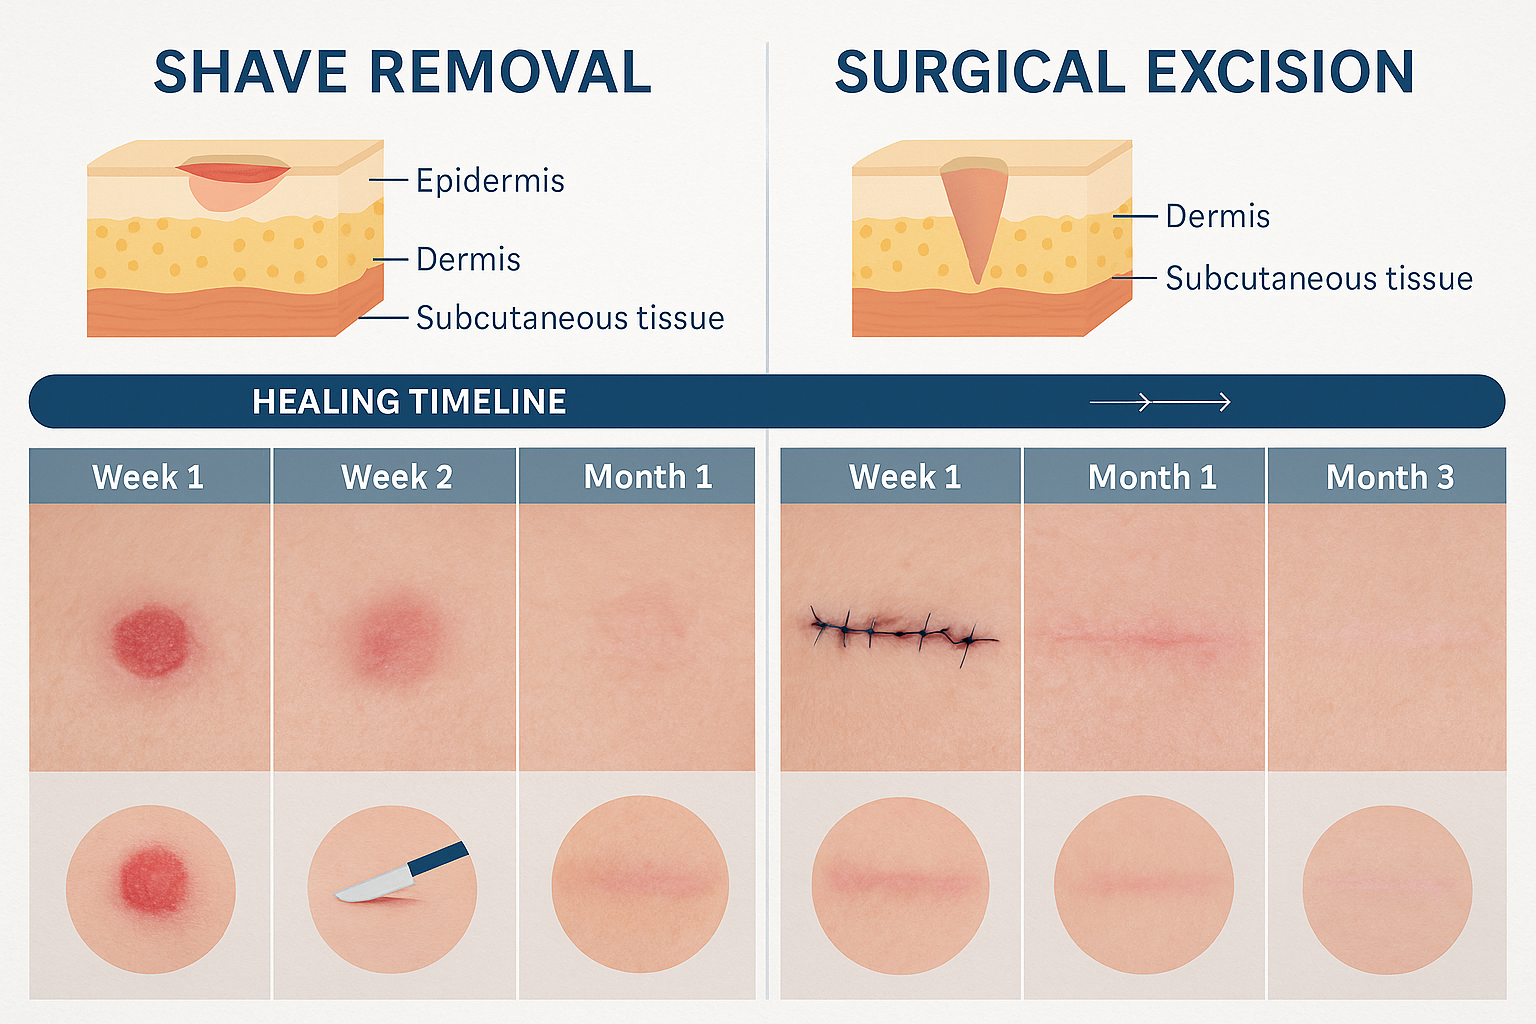
The removal technique significantly impacts what happens to the tissue after your mole is removed. Different methods create different wound types with varying healing characteristics.

Shave Removal: Superficial Tissue Impact

Shave removal involves using a surgical blade to cut the mole flush with or slightly below the skin surface. This technique:

  • Removes only superficial tissue layers
  • Leaves minimal scarring because deeper tissue remains intact [13]
  • Heals quickly (typically 2-3 weeks for complete surface closure) [1][3][13]
  • Initially leaves pink skin that gradually fades
  • Doesn't require stitches
  • May result in a slight depression or lighter-colored area

The limited tissue trauma means the body's healing response is less extensive, resulting in faster recovery and less prominent scarring.

Surgical Excision: Deeper Tissue Removal

Surgical excision cuts deeper into the skin to remove the entire mole plus a margin of surrounding tissue. This approach:

  • Creates a deeper wound extending through multiple skin layers [1][3][13]
  • Requires stitches to close the wound edges
  • Takes longer to heal (typically 4-6 weeks for complete closure) [1][3][13]
  • Produces more substantial scar tissue
  • Provides complete removal with clear margins for pathology analysis
  • Results in a linear scar along the incision line

The deeper tissue disruption triggers a more robust healing response with more extensive collagen deposition and scar formation.

Laser Removal: Pigment Breakdown

Laser removal works differently than cutting techniques. The laser energy:

  • Breaks down pigment cells within the mole [5]
  • Doesn't physically remove tissue in the traditional sense
  • Allows the body to naturally eliminate fragmented pigment through metabolic processes [5]
  • Doesn't require stitching
  • Causes minimal tissue trauma
  • May require multiple sessions for complete pigment removal

The tissue response involves gradual pigment fading rather than wound closure, resulting in a different healing experience.

Normal Healing Signs vs. Warning Symptoms

Understanding normal healing helps patients distinguish expected changes from complications requiring medical attention.

Normal Healing Signs

  • Mild redness around the wound
  • Pink or red appearance of new skin
  • Slight firmness or texture changes
  • Gradual fading of discoloration
  • Mild itching as healing progresses
  • Scab formation and natural shedding

Warning Signs Requiring Medical Attention ⚠️

  • Increasing redness spreading beyond the wound
  • Significant swelling or warmth
  • Pus or yellow-green discharge
  • Fever or chills
  • Severe pain not controlled by over-the-counter medication
  • Wound edges separating or opening
  • Bleeding that doesn't stop with gentle pressure
  • Red streaks extending from the wound

Patients experiencing concerning symptoms should contact their healthcare provider promptly or visit The Minor Surgery Center for evaluation.

Scar Tissue Formation: The Body's Permanent Record

Cross-sectional anatomical diagram of skin tissue healing stages after mole removal, showing epidermis and dermis layers, wound closure prog

When tissue trauma extends into the deeper layers of skin (the dermis), the body cannot regenerate identical replacement tissue. Instead, it creates scar tissue—a specialized type of connective tissue that permanently marks the site of injury [11].

Why Scars Form After Mole Removal

Scar formation represents the body's efficient solution to structural damage. When the dermis is disrupted:

  1. The body prioritizes rapid closure over perfect reconstruction
  2. Fibroblast cells produce collagen fibers to bridge the gap
  3. These collagen fibers arrange in parallel bundles rather than the complex basket-weave pattern of normal skin
  4. The resulting tissue is strong but lacks the flexibility and appearance of undamaged skin

Superficial injuries that only affect the epidermis (top skin layer) can heal without scarring because epidermal cells can regenerate perfectly. However, mole removal typically extends into the dermis, making some degree of scarring inevitable.

The Scar Maturation Process

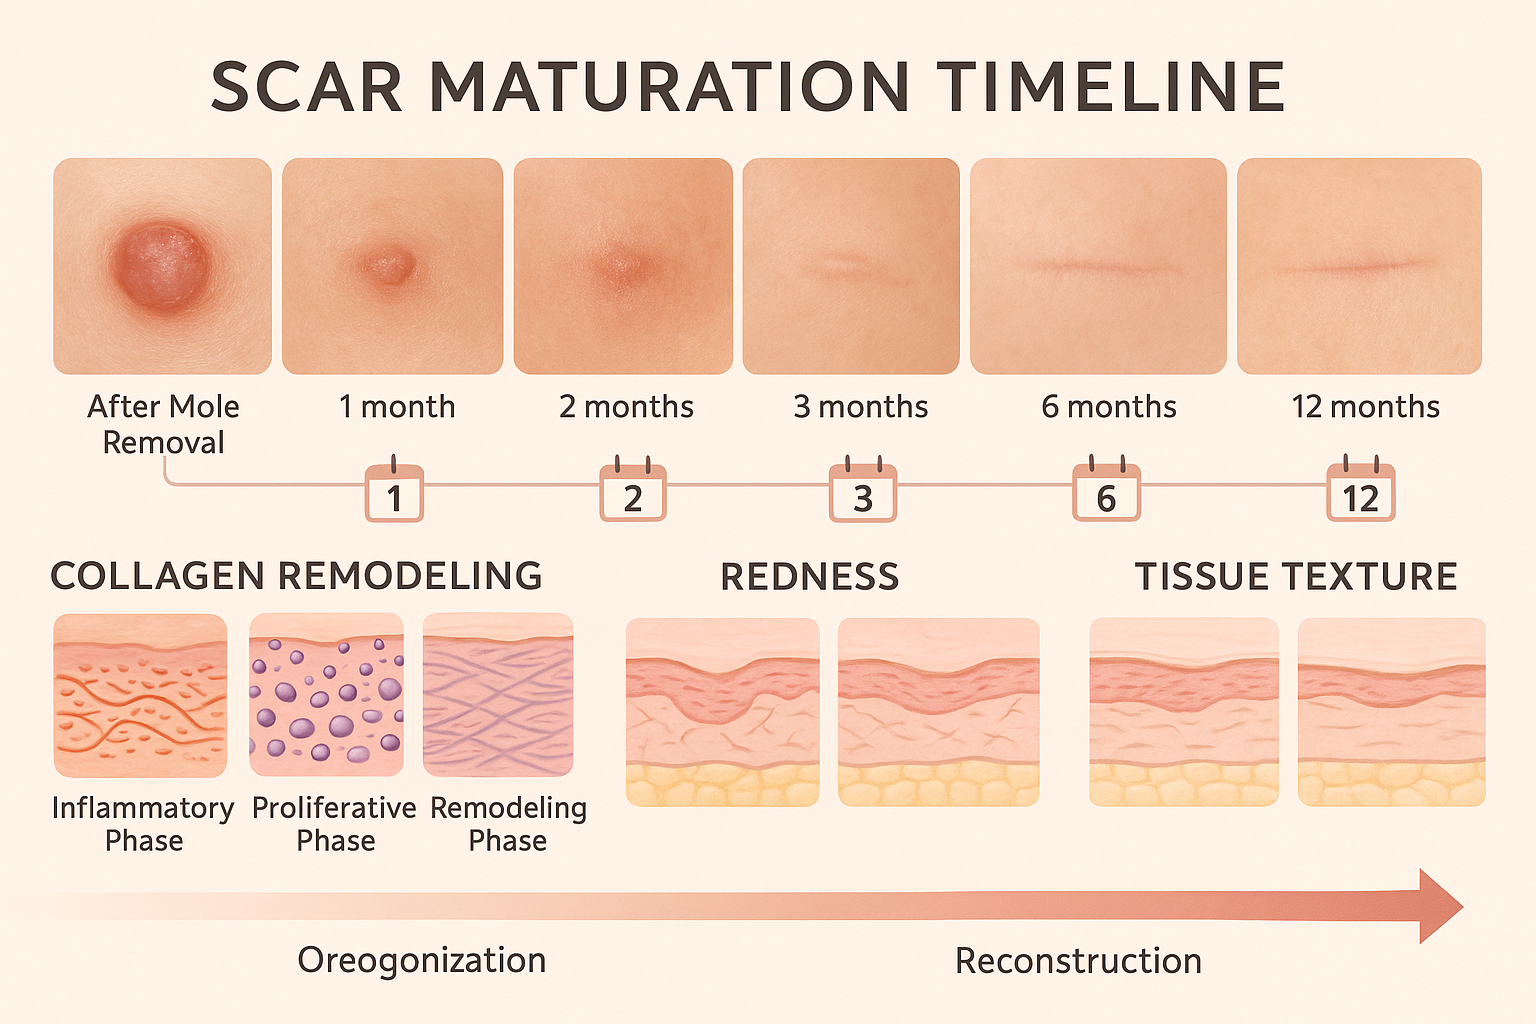
Scar tissue doesn't form instantly—it develops and changes over approximately one year following tissue removal [9]. This maturation process involves several phases:

Early Scar (0-3 Months)

  • Appears red or pink due to abundant blood vessels
  • Feels firm, raised, or thick
  • May be tender to touch
  • Actively depositing collagen

Maturing Scar (3-6 Months)

  • Color begins fading from red to pink
  • Height may decrease slightly
  • Texture starts softening
  • Blood vessel density decreases

Mature Scar (6-12 Months)

  • Color approaches normal skin tone (often slightly lighter)
  • Texture becomes softer and flatter
  • Final appearance becomes apparent
  • Remodeling continues at slower pace

"Scar tissue continues to develop and mature for approximately one year post-removal, with the scar fully formed by the one-year mark." [9]

Factors Affecting Scar Appearance

Multiple factors influence how noticeable a scar becomes after mole removal:

Patient Factors:

  • Age: Younger skin produces more collagen, potentially creating more prominent scars
  • Genetics: Family history of keloid or hypertrophic scarring
  • Skin tone: Darker skin may develop more visible pigment changes
  • Overall health: Conditions like diabetes can affect healing

Procedural Factors:

  • Removal method: Shave removal creates less scarring than deep excision
  • Surgeon skill: Precise technique minimizes tissue trauma
  • Location: Areas under tension (shoulders, chest) scar more prominently
  • Wound size: Larger removals create larger scars

Aftercare Factors:

  • Sun protection: UV exposure can darken healing scars
  • Wound care: Proper cleaning and moisturizing support optimal healing
  • Activity level: Excessive movement can stress healing tissue
  • Infection prevention: Infection increases scarring risk

Minimizing Scar Formation

While some scarring is inevitable after mole removal extending into the dermis, several strategies can optimize the final appearance:

During the Healing Phase:

  • Keep the wound clean and moisturized
  • Avoid picking at scabs or healing tissue
  • Protect from sun exposure with SPF 30+ sunscreen
  • Follow all aftercare instructions from your healthcare provider
  • Avoid strenuous activity that stresses the wound area
  • Consider silicone gel sheets or scar creams after initial healing

Long-Term Scar Management:

  • Massage mature scars to improve texture
  • Continue sun protection indefinitely
  • Consider professional scar treatments if needed (laser therapy, steroid injections)
  • Maintain realistic expectations about final appearance

Patients concerned about scarring should discuss their concerns with their provider before the procedure. Choosing an experienced practitioner at facilities like The Minor Surgery Center in Barrie can help ensure optimal cosmetic outcomes.

Understanding Different Tissue Responses: Comparing Removal Techniques

The method used to remove a mole fundamentally determines what happens to the tissue after your mole is removed. Each technique creates a different type of wound with unique healing characteristics.

Comprehensive Comparison of Tissue Impact

Removal MethodTissue DepthHealing TimeScarringStitches RequiredBest ForShave RemovalSuperficial (epidermis to upper dermis)2-3 weeksMinimal, often just color changeNoRaised moles, cosmetic removalSurgical ExcisionDeep (through dermis, possibly into fat)4-6 weeksLinear scar, more visibleYesSuspicious moles, complete removal neededLaser RemovalVariable (targets pigment)2-4 weeksMinimalNoFlat pigmented moles, cosmetic concernsCryotherapySuperficial to moderate2-3 weeksPossible lighteningNoBenign lesions, pre-cancerous spots

Shave Removal: Tissue Healing Details

What Happens During the Procedure: The physician uses a small surgical blade to shave the mole flush with or slightly below the surrounding skin surface. Only the raised portion is removed, leaving the base of the mole cells in the dermis.

Tissue Response:

  • Immediate: Superficial bleeding controlled with cauterization or chemical agents
  • Day 1-3: Scab formation over the wound surface
  • Week 1-2: Epithelial cells migrate across the wound, closing the surface [17]
  • Week 2-4: Scab falls off, revealing pink new skin [13]
  • Month 1-3: Pink color gradually fades
  • Long-term: Often leaves a slightly lighter, flatter area with minimal texture change

Advantages for Tissue Healing:

  • Minimal tissue trauma
  • Fast recovery
  • Less scar formation
  • No stitches to remove
  • Lower infection risk

Limitations:

  • May not remove all mole cells (possible regrowth)
  • Not suitable for suspicious lesions requiring complete removal
  • May leave slight depression

Surgical Excision: Tissue Healing Details

What Happens During the Procedure: The surgeon cuts around and beneath the mole, removing it entirely along with a margin of normal tissue. The wound edges are brought together with stitches.

Tissue Response:

  • Immediate: Controlled bleeding, wound closure with sutures
  • Day 1-7: Inflammation, initial healing beneath stitches
  • Week 1-2: Early collagen deposition, epithelialization begins
  • Week 2-4: Surface closure completes, stitches removed [17]
  • Month 1-3: Scar forms along incision line, initially red and firm
  • Month 3-12: Scar maturation, gradual fading and softening [9]

Advantages for Tissue Healing:

  • Complete removal ensures clear margins
  • Best for suspicious lesions
  • Provides adequate tissue for pathology
  • Controlled scar placement

Limitations:

  • Longer healing time
  • More prominent scarring
  • Requires stitches and follow-up removal
  • Greater tissue trauma

Laser Removal: Tissue Healing Details

What Happens During the Procedure: Concentrated light energy targets the pigment within mole cells, breaking them apart without cutting tissue.

Tissue Response:

  • Immediate: Pigment cells absorb laser energy and fragment
  • Day 1-7: Mild inflammation, possible crusting
  • Week 1-2: Body's immune system begins removing fragmented pigment [5]
  • Week 2-4: Gradual lightening of treated area
  • Month 1-3: Continued pigment clearance through natural processes
  • Long-term: Minimal to no scarring, possible slight color variation

Advantages for Tissue Healing:

  • No cutting or stitches
  • Minimal tissue trauma
  • Very low scarring risk
  • Comfortable recovery

Limitations:

  • Not suitable for raised moles
  • Cannot provide tissue for pathology
  • May require multiple sessions
  • Not appropriate for suspicious lesions

Understanding these differences helps patients make informed decisions about which removal method best suits their needs and expectations for healing. For those exploring options, consulting with specialists who offer various techniques, such as those at The Minor Surgery Center, ensures personalized treatment planning.

Supporting Optimal Tissue Healing After Mole Removal

Side-by-side comparison visual showing shave removal versus surgical excision healing timelines, split-screen layout with wound depth diagra

While the body's healing mechanisms are largely automatic, patients can take specific actions to support optimal tissue recovery and minimize complications.

Immediate Post-Procedure Care (First 24-48 Hours)

Wound Protection 🛡️

  • Keep the initial bandage in place for the time specified by your provider (usually 24 hours)
  • Avoid getting the wound wet during the first day
  • Don't touch or manipulate the wound site
  • Avoid strenuous activity that could stress the area

Managing Discomfort

  • Take over-the-counter pain relievers as recommended (typically acetaminophen or ibuprofen)
  • Apply ice packs (wrapped in cloth) near the area to reduce swelling
  • Expect mild stinging or burning sensations [6]
  • Elevate the area if possible to minimize swelling

Short-Term Healing Support (Days 2-14)

Wound Cleaning

  • Gently clean the area once or twice daily with mild soap and water
  • Pat dry with a clean towel—don't rub
  • Apply antibiotic ointment if recommended by your provider
  • Cover with a fresh bandage until the wound surface closes

Activity Modifications

  • Avoid swimming pools, hot tubs, and natural bodies of water
  • Limit activities that cause sweating over the wound
  • Protect the area from trauma or bumping
  • Resume normal activities gradually as healing progresses

Monitoring for Complications

Check the wound daily for signs of infection or healing problems:

  • Increasing redness or warmth
  • Swelling that worsens rather than improves
  • Discharge or pus
  • Increasing pain
  • Fever or general illness

Medium-Term Healing Support (Weeks 2-8)

Scar Care Begins

Once the surface has closed and any scabs have fallen off:

  • Begin applying silicone gel or sheets if recommended
  • Gently massage the area to improve tissue flexibility
  • Keep the area moisturized with fragrance-free lotion
  • Continue protecting from sun exposure

Sun Protection ☀️

UV exposure can darken healing tissue and make scars more visible:

  • Apply broad-spectrum SPF 30+ sunscreen to the area
  • Reapply every 2 hours when outdoors
  • Consider covering the area with clothing when possible
  • Continue sun protection for at least one year

Long-Term Healing Support (Months 2-12)

Scar Maturation Support

  • Continue daily sun protection
  • Massage mature scars regularly
  • Maintain skin hydration
  • Be patient—full maturation takes approximately one year [9]

When to Consider Scar Treatment

If the scar remains prominently red, raised, or bothersome after several months, discuss options with your provider:

  • Laser scar revision
  • Steroid injections for raised scars
  • Topical scar treatments
  • Surgical scar revision in rare cases

Nutrition and Healing

Proper nutrition supports tissue healing from the inside:

Protein: Essential for collagen production and tissue repair

  • Lean meats, fish, eggs, legumes, dairy

Vitamin C: Critical for collagen synthesis

  • Citrus fruits, berries, peppers, broccoli

Zinc: Supports immune function and wound healing

  • Meat, shellfish, seeds, nuts

Vitamin A: Promotes epithelial cell growth

  • Sweet potatoes, carrots, leafy greens

Hydration: Adequate water intake supports all cellular processes

  • Aim for 8+ glasses of water daily

Special Considerations for Different Body Areas

Healing varies by location due to differences in skin thickness, movement, and tension:

Face and Neck

  • Generally heal quickly due to excellent blood supply
  • Scars often less noticeable
  • Sun protection especially important

Trunk (Chest, Back, Shoulders)

  • Areas under tension may develop wider scars
  • Higher risk of hypertrophic scarring
  • Extra care with activity restrictions

Extremities (Arms, Legs)

  • Moderate healing speed
  • Movement can stress healing tissue
  • Keep activity modifications in mind

Understanding what happens to the tissue after your mole is removed at each healing stage empowers patients to actively support their recovery and recognize when professional intervention is needed.

Frequently Asked Questions About Tissue After Mole Removal

How long does removed mole tissue stay in the lab?

The tissue remains in the pathology laboratory permanently. After examination, the tissue slides and paraffin blocks are archived and stored for many years (typically 10-20 years or more) for future reference if needed. This allows for second opinions or additional testing if questions arise later.

Can I request my mole tissue back after testing?

While legally the tissue belongs to the patient, practical considerations make this unusual. The tissue has been chemically preserved, embedded in wax, and sliced into microscopic sections—it's no longer in its original form. Most patients don't request tissue return, but you can discuss this with your healthcare provider if you have specific concerns.

Will my mole grow back after removal?

This depends on the removal method:

  • Shave removal: May leave some cells in deeper skin layers, allowing possible regrowth (10-20% chance)
  • Surgical excision: Removes the entire mole with margins, making regrowth very unlikely
  • Laser removal: May not destroy all pigment cells, sometimes requiring repeat treatments

If a mole does recur after removal, inform your healthcare provider, as this may warrant re-evaluation.

Why does the healing area feel rough or bumpy?

During weeks 2-4 after removal, the body actively builds new tissue and deposits collagen [13]. This creates a temporarily rough or textured feeling. As scar maturation continues over the following months, this texture typically softens and smooths.

Is redness normal months after mole removal?

Yes. The wound area typically remains red for weeks to months after the surface has healed [3]. This redness represents active scar maturation with abundant blood vessels supporting tissue remodeling. The color gradually fades over the first year. However, increasing redness or redness accompanied by warmth, swelling, or pain may indicate infection and requires medical evaluation.

Can I speed up the healing process?

While you can't dramatically accelerate healing, you can optimize it:

  • Follow all aftercare instructions carefully
  • Maintain good nutrition and hydration
  • Avoid smoking (impairs healing)
  • Protect from sun exposure
  • Keep the area clean and moisturized
  • Avoid activities that stress the healing tissue

The body's healing timeline is largely predetermined by biological processes, but proper care ensures the best possible outcome within that timeframe.

What if my pathology report shows something concerning?

If the pathology reveals atypical cells, dysplasia, or cancer, your healthcare provider will discuss next steps, which may include:

  • Additional tissue removal to ensure clear margins
  • Referral to a dermatology specialist or oncologist
  • More frequent skin monitoring
  • Additional diagnostic testing

For concerning findings related to melanoma or other types of skin cancer, seeking care at a specialized facility ensures comprehensive management.

Conclusion: Understanding the Complete Journey of Tissue After Mole Removal

Detailed scar maturation timeline infographic showing 12-month healing journey after mole removal, featuring monthly progression photos of h

What happens to the tissue after your mole is removed involves two simultaneous journeys: the excised tissue travels to a pathology laboratory for microscopic analysis that rules out skin cancer and confirms diagnosis, while the tissue remaining at the wound site undergoes a remarkable natural healing process spanning weeks to months.

The laboratory analysis provides critical safety information, examining cellular details invisible to the naked eye and ensuring that what appeared benign truly is. This standard medical practice protects patients and guides appropriate follow-up care. Meanwhile, at the removal site, the body orchestrates a complex healing response—blood clotting, inflammation, epithelialization, and scar formation—that closes the wound and creates permanent tissue repair.

Key points to remember:

Removed tissue undergoes professional pathology analysis to ensure accurate diagnosis and rule out cancer

Healing timelines vary by removal method: shave removal heals in 2-3 weeks, while surgical excision requires 4-6 weeks for surface closure

Scar maturation continues for approximately one year, with gradual fading and softening throughout this period

Normal healing includes redness, texture changes, and mild discomfort—but increasing symptoms warrant medical attention

Patient actions matter: proper wound care, sun protection, and healthy lifestyle choices support optimal healing

Next Steps: Taking Action

If you're considering mole removal:

  1. Consult a qualified healthcare provider to evaluate your specific situation and recommend the most appropriate removal method
  2. Ask questions about what to expect during healing and what your tissue analysis will involve
  3. Discuss cosmetic concerns openly so your provider can choose techniques that optimize both safety and appearance
  4. Review aftercare instructions before the procedure so you're prepared

If you've recently had a mole removed:

  1. Follow all aftercare instructions provided by your healthcare team
  2. Monitor the healing site daily for normal progress or warning signs
  3. Protect the area from sun exposure throughout the healing period and beyond
  4. Be patient with the healing timeline—complete scar maturation takes up to one year
  5. Contact your provider if you have questions or concerns about your healing progress

If you're awaiting pathology results:

  1. Understand the timeline: most results arrive within 5-10 business days
  2. Don't panic: the vast majority of mole removals reveal benign tissue
  3. Follow up to ensure you receive and understand your results
  4. Ask questions about any findings you don't understand

For those seeking expert mole removal with comprehensive pathology services and attentive aftercare, The Minor Surgery Center offers specialized care focused on both medical accuracy and optimal cosmetic outcomes. Understanding what happens to the tissue after your mole is removed empowers you to participate actively in your care, recognize normal healing, and achieve the best possible results from your procedure.

The journey of tissue after mole removal—both the excised specimen and the healing wound—represents modern medicine's commitment to thorough diagnosis and natural healing processes working in harmony to protect your health and restore your skin.

References

[1] Medical literature on mole removal procedures and tissue handling protocols

[2] Dermatological pathology standards and practices

[3] Wound healing timeline studies and clinical observations

[4] Histopathological examination procedures

[5] Laser mole removal mechanisms and tissue response

[6] Post-procedural symptom expectations

[7] Epithelialization and wound closure research

[8] Tissue preservation and laboratory protocols

[9] Scar maturation timeline studies

[10] Collagen remodeling during healing

[11] Scar tissue formation mechanisms

[12] Comparative healing studies by removal method

[13] Clinical observations of healing progression

[14] Dermatological surgery best practices

[15] Pathology reporting standards

[16] Wound care recommendations

[17] Healing timeline variations by procedure type

November 27, 2025
🇨🇦 Our clinic currently provides care to patients within Canada only. We apologize for any inconvenience this may cause.