Stitches After Sebaceous Cyst Removal: Your Complete Recovery Guide
When that pesky sebaceous cyst finally gets removed, you might think the hard part is over. But then you look down at those stitches and wonder: "Now what?" 🤔 The truth is, proper care of your stitches after sebaceous cyst removal can make the difference between a smooth recovery and complications that could have been easily avoided.
Whether you're preparing for surgery or currently sporting fresh stitches, understanding what lies ahead empowers you to heal faster and minimize scarring. From knowing when to worry about that slight redness to mastering the art of gentle cleaning, this guide covers everything you need to navigate your post-surgical journey with confidence.
Key Takeaways
• Proper stitch care is crucial - Keep the area clean and dry, follow your surgeon's specific instructions, and avoid activities that could strain the incision
• Normal healing includes mild swelling and redness - However, increasing pain, excessive drainage, or red streaking requires immediate medical attention
• Most stitches are removed within 7-14 days - The timeline depends on the cyst's location, size, and your individual healing process
• Scar prevention starts immediately - Gentle care, sun protection, and following post-operative instructions significantly impact your final cosmetic result
• When in doubt, contact your healthcare provider - It's always better to ask questions than risk complications during recovery
Understanding Sebaceous Cyst Removal Surgery
Sebaceous cysts are common, benign growths that develop when hair follicles become blocked. While they're typically harmless, many people choose removal for cosmetic reasons or because the cyst has become infected, painful, or continues growing.
The Surgical Process
The removal procedure itself is relatively straightforward. Your surgeon will:
Numb the area with local anesthetic
Make a small incision over the cyst
Carefully remove the entire cyst wall to prevent recurrence
Close the incision with stitches
The type and number of stitches depend on several factors, including the cyst's size, location, and your skin's characteristics. Understanding this process helps you appreciate why proper aftercare is so important for optimal healing.
Types of Stitches Used
Not all stitches are created equal. Your surgeon might use:
Absorbable Stitches (Dissolvable)
Made from materials that break down naturally
Don't require removal
Often used for deeper layers of tissue
May take 1-3 weeks to dissolve completely
Non-Absorbable Stitches
Made from materials like nylon or silk
Require removal by a healthcare professional
Typically removed within 7-14 days
Often used for skin closure
Surgical Staples
Less common for small cyst removals
Faster to place but require removal
May leave small marks if not removed promptly
Your healthcare provider will choose the best option based on your specific situation and the location of your cyst.
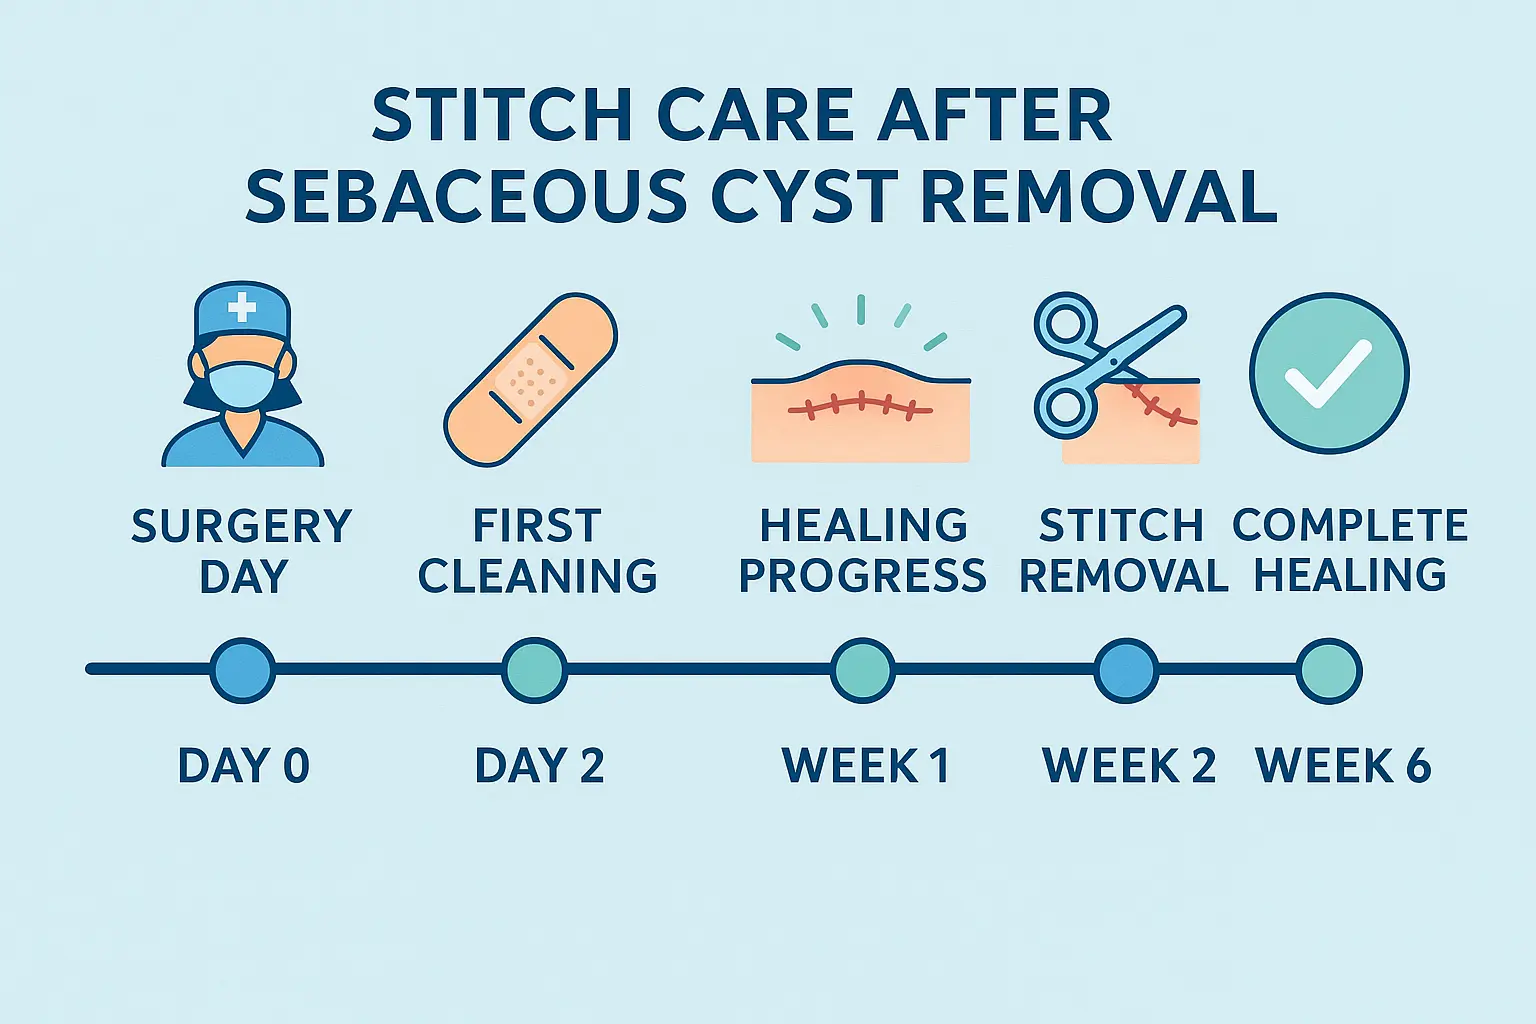
Immediate Post-Surgery Care for Stitches
The first 24-48 hours after your sebaceous cyst removal are critical for setting the stage for proper healing. Here's what you need to know about caring for your stitches during this crucial period.
The First 24 Hours
Keep It Dry 💧 Your surgeon will likely apply a protective dressing immediately after the procedure. This initial bandage should stay in place for at least 24 hours unless you're specifically instructed otherwise. Avoid getting the area wet during this time - no showers, baths, or swimming.
Manage Discomfort Some pain and discomfort are normal after surgery. Over-the-counter pain relievers like acetaminophen or ibuprofen can help manage this discomfort. However, always follow your surgeon's recommendations, as some medications can affect bleeding.
Watch for Immediate Complications While serious complications are rare, be alert for:
Excessive bleeding that soaks through the bandage
Severe pain that worsens rather than improves
Signs of allergic reaction to anesthesia or medications
Days 2-7: Establishing Your Care Routine
Once you've passed the initial 24-hour mark, you'll typically receive instructions to begin gentle cleaning and dressing changes.
Cleaning Your Stitches
Wash your hands thoroughly before touching the area
Gently clean around the stitches with mild soap and water
Pat dry with a clean towel - never rub
Apply any prescribed ointments as directed
Cover with a fresh bandage if recommended
Activity Restrictions During the first week, avoid:
Heavy lifting (typically anything over 10 pounds)
Strenuous exercise or activities that cause sweating
Activities that could stretch or strain the incision site
Swimming or soaking in water
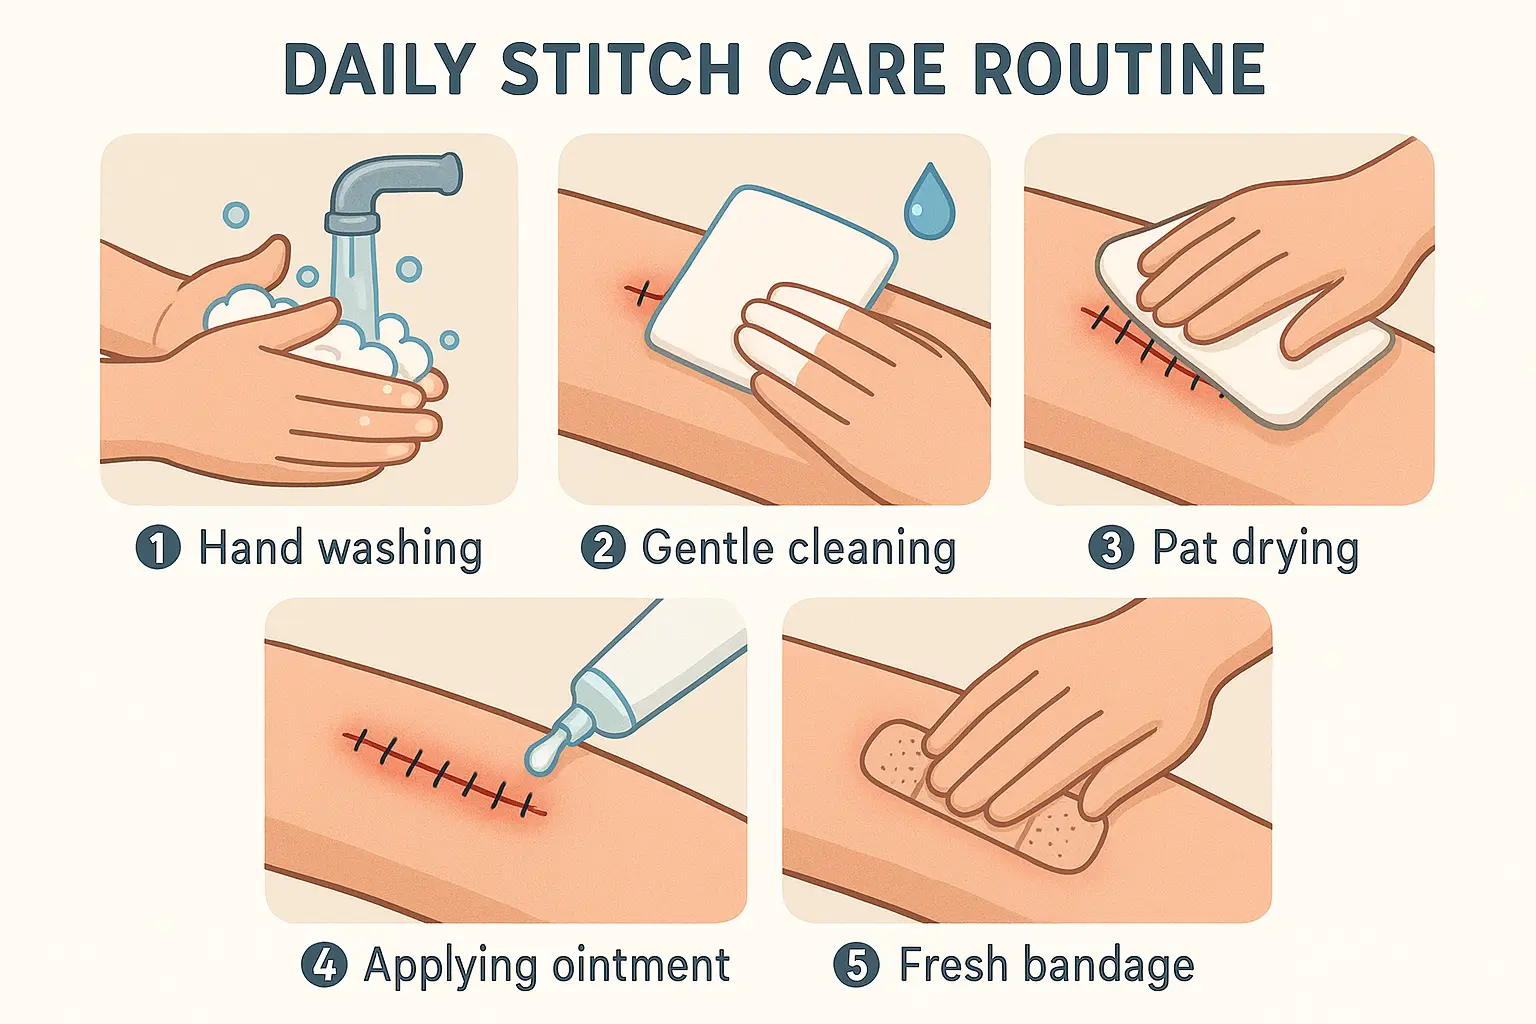
Daily Stitch Care Routine
Establishing a consistent daily routine for caring for your stitches after sebaceous cyst removal is essential for optimal healing. Here's a step-by-step guide to help you maintain proper wound care throughout your recovery.
Morning Care Routine
Step 1: Preparation 🧼 Start each day by washing your hands thoroughly with antibacterial soap. This simple step prevents introducing bacteria to your healing incision.
Step 2: Gentle Inspection Look at your stitches in good lighting. Note any changes in:
Color (slight redness is normal, but increasing redness isn't)
Swelling (should gradually decrease over time)
Drainage (small amounts of clear fluid are normal initially)
Step 3: Cleaning Process
Remove the old dressing carefully
Clean around the stitches with mild soap and lukewarm water
Use a soft cloth or cotton swab - never scrub
Rinse thoroughly to remove all soap residue
Pat completely dry with a clean towel
Step 4: Apply Treatment If your surgeon prescribed antibiotic ointment or other topical treatments, apply a thin layer as directed. Too much ointment can actually slow healing by keeping the area too moist.
Step 5: Fresh Dressing Apply a new, sterile bandage if recommended by your healthcare provider. Some small incisions may be left uncovered after the first few days.
Evening Care Routine
Your evening routine should mirror your morning care, with special attention to:
Checking for any changes that occurred during the day
Ensuring the area stays clean after daily activities
Replacing dressings that may have become soiled or loose
Weekly Progress Checkpoints
Each week, take note of your healing progress:
Week 1:
Initial swelling and discomfort should peak and begin to subside
Incision edges should start to close
Any bruising begins to fade
Week 2:
Significant reduction in tenderness
Incision should be well-closed
Time for stitch removal (if non-absorbable stitches were used)
Many patients find it helpful to take photos of their healing progress to share with their healthcare provider during follow-up appointments.
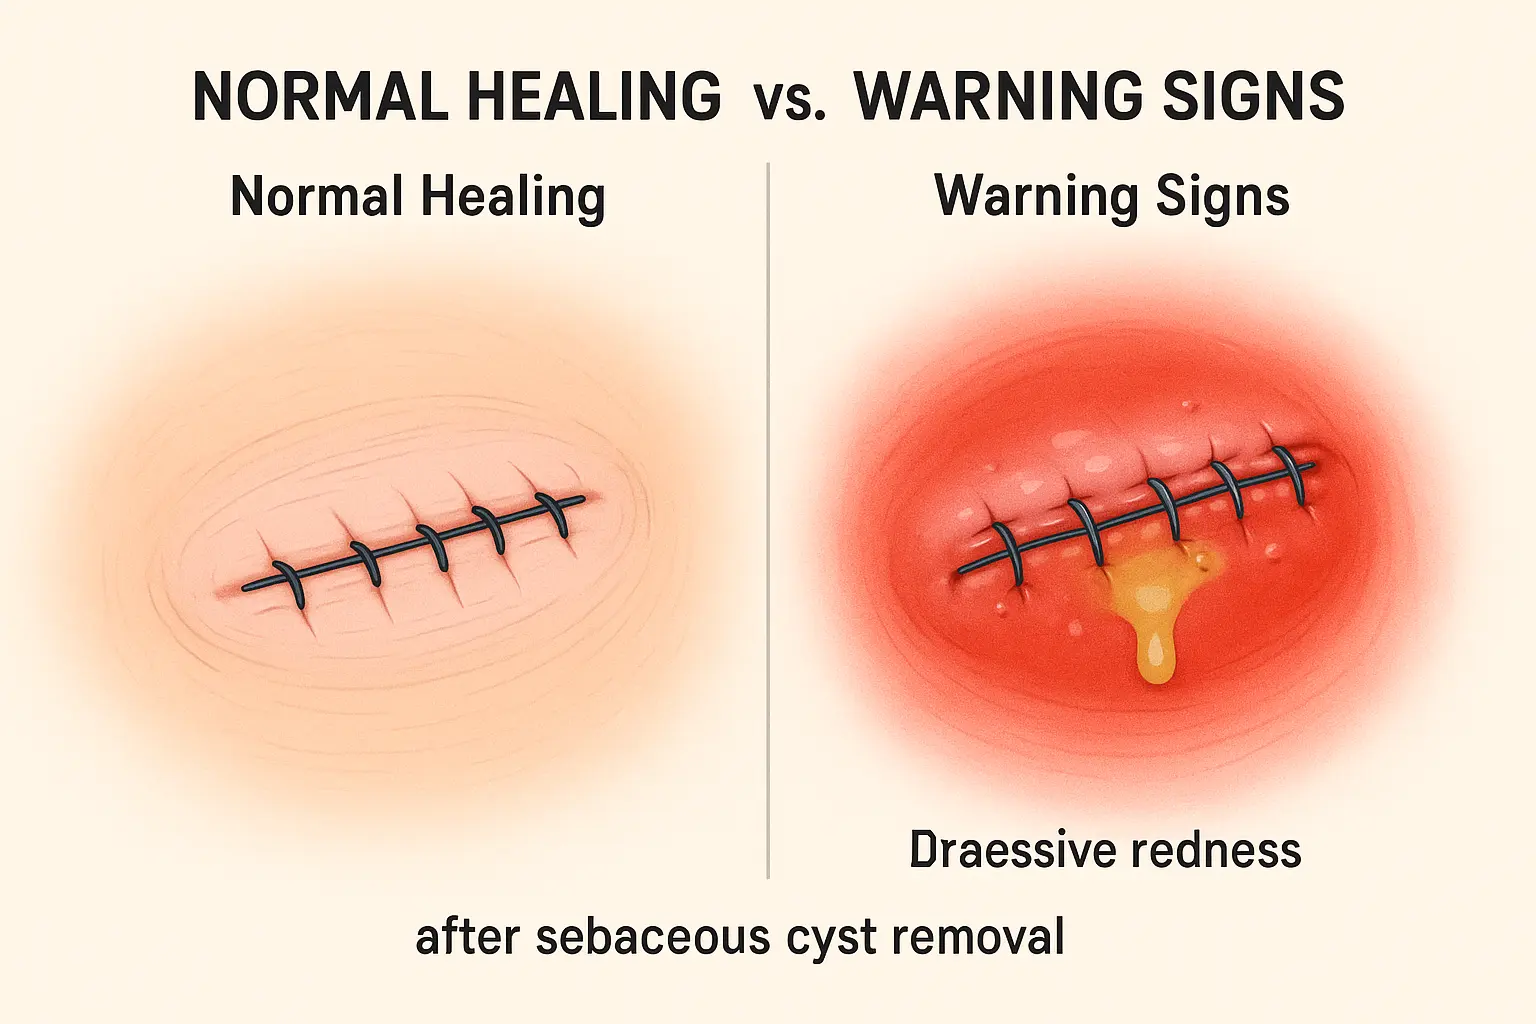
Signs of Normal Healing vs. Complications
Understanding what's normal during the healing process can save you unnecessary worry and help you identify when professional attention is needed.
Normal Healing Signs ✅
First 48 Hours:
Mild to moderate pain that responds to over-the-counter pain medication
Some swelling around the incision site
Light pink or red coloration around the stitches
Small amount of clear or slightly bloody drainage
Days 3-7:
Gradual decrease in pain and swelling
Incision edges beginning to close and seal
Slight itching as healing progresses
Reduced drainage
Week 2 and Beyond:
Minimal discomfort
Well-closed incision
Fading of any bruising or discoloration
Formation of a healing scar
Warning Signs Requiring Immediate Attention 🚨
Contact your healthcare provider immediately if you experience:
Infection Signs:
Increasing redness that spreads beyond the incision
Red streaking extending from the wound
Pus or thick, yellow-green drainage
Foul odor from the incision
Fever over 101°F (38.3°C)
Increasing pain rather than gradual improvement
Wound Complications:
Separation of incision edges (dehiscence)
Excessive bleeding that doesn't stop with gentle pressure
Hard lumps or bumps under the skin
Severe swelling that worsens after day 3
Allergic Reactions:
Severe itching or rash around the stitches
Difficulty breathing (seek emergency care)
Widespread skin reactions
When to Call vs. When to Seek Emergency Care
Call Your Doctor's Office:
Questions about normal healing
Mild concerns about appearance
Need for pain management advice
Scheduling follow-up appointments
Seek Emergency Care:
Signs of serious infection with fever
Severe bleeding
Allergic reactions affecting breathing
Severe, worsening pain
Remember, your surgical team would rather answer your questions than deal with preventable complications later.
Stitch Removal Process and Timeline
The removal of stitches after sebaceous cyst removal marks an important milestone in your recovery journey. Understanding what to expect can help ease any anxiety about this final step.
Typical Timeline for Stitch Removal
Location Matters: The timing of stitch removal depends largely on where your cyst was located:
Body AreaTypical Removal TimeHealing ConsiderationsFace5-7 daysFaster healing, cosmetic concernsScalp7-10 daysGood blood supply, hair protectionNeck7-10 daysMobile area, gentle care neededBack10-14 daysSlower healing, movement stressArms/Legs7-10 daysActivity level affects timing
Individual Factors: Several personal factors can influence your timeline:
Age: Younger patients typically heal faster
Overall health: Diabetes, immune conditions may slow healing
Smoking: Significantly delays healing process
Nutrition: Proper protein and vitamin intake supports healing
Cyst size: Larger removals may need longer healing time
What to Expect During Stitch Removal
The Process: Stitch removal is typically quick and causes minimal discomfort:
Cleaning: The area is cleaned with antiseptic
Examination: Your provider checks healing progress
Removal: Each stitch is carefully cut and pulled out
Final assessment: The incision is examined for complete closure
Sensations You Might Feel:
Slight tugging or pulling sensation
Brief, sharp feeling as each stitch is removed
Relief of any tension from the stitches
Mild stinging from antiseptic cleaning
Most patients describe the discomfort as much less than they anticipated.
Preparing for Your Appointment
Before You Go:
Take your regular pain medication if the area is still tender
Wear clothing that provides easy access to the incision
Prepare any questions about ongoing care
Bring a list of any concerns you've noticed
Questions to Ask:
When can you resume normal activities?
Are there any ongoing restrictions?
What scar care do they recommend?
When should you schedule follow-up if needed?
Care After Stitch Removal
Immediate Aftercare: Even after stitches are removed, your incision needs continued care:
Keep the area clean with gentle soap and water
Avoid stretching the incision for another week
Protect from sun exposure to prevent darkening of the scar
Watch for any signs of the incision reopening
Activity Resumption: Your provider will give specific guidelines, but generally:
Light activities: Usually okay immediately
Exercise: May need to wait another week
Swimming: Often restricted for 1-2 more weeks
Heavy lifting: Depends on incision location and size
The team at our clinic provides detailed post-removal instructions tailored to your specific situation.
Managing Pain and Discomfort
Pain management after sebaceous cyst removal doesn't have to be complicated. With the right approach, most patients experience minimal discomfort throughout their recovery.
Understanding Post-Surgical Pain
Normal Pain Patterns:
Peak discomfort: Usually occurs 24-48 hours after surgery
Gradual improvement: Pain should steadily decrease each day
Timing: Most significant pain resolves within 3-5 days
Quality: Described as aching, throbbing, or tight sensation
Factors Affecting Pain Levels:
Size and depth of the cyst removal
Location on the body (face typically less painful than back)
Individual pain tolerance
Quality of post-operative care
Medication Options
Over-the-Counter Solutions:
Acetaminophen (Tylenol) 💊
Excellent for mild to moderate pain
Safe for most people
Can be combined with other pain relievers
Typical dose: 650-1000mg every 6-8 hours
Ibuprofen (Advil, Motrin)
Reduces both pain and inflammation
Particularly effective for surgical pain
Take with food to prevent stomach upset
Typical dose: 400-600mg every 6-8 hours
Combination Approach: Many surgeons recommend alternating acetaminophen and ibuprofen for optimal pain control:
Take acetaminophen at 8 AM, 2 PM, 8 PM
Take ibuprofen at 11 AM, 5 PM, 11 PM
This provides around-the-clock coverage
Prescription Pain Medication: For larger cyst removals, your surgeon might prescribe:
Short-term opioid medications
Stronger anti-inflammatory drugs
Topical pain relievers
Non-Medication Pain Management
Cold Therapy ❄️
Apply ice packs for 15-20 minutes at a time
Use during the first 48-72 hours
Wrap ice in a thin cloth to protect skin
Helps reduce swelling and numb pain
Positioning and Rest
Elevate the area when possible to reduce swelling
Use pillows to support and protect the incision
Avoid positions that stretch or strain the area
Get adequate sleep to support healing
Distraction Techniques
Light reading or entertainment
Relaxation breathing exercises
Gentle meditation or mindfulness
Social activities that don't strain the incision
Gradual Activity
Start with very light movement as tolerated
Gradually increase activity as pain decreases
Listen to your body and don't push through significant pain
Movement actually helps with healing when done appropriately
When Pain Becomes a Concern
Red Flags: 🚩 Contact your healthcare provider if you experience:
Pain that worsens after day 3
Severe pain not controlled by medication
Pain accompanied by fever or other infection signs
Sudden, sharp increases in pain
Pain that prevents sleep despite medication
Managing Expectations: Remember that some discomfort is completely normal. The goal isn't to eliminate all sensation, but to keep pain at a manageable level that allows for rest and gradual return to activities.
For personalized pain management advice, don't hesitate to contact our medical team who can adjust your care plan based on your specific needs.
Activity Restrictions and Lifestyle Modifications
Knowing what you can and can't do after sebaceous cyst removal helps ensure optimal healing while maintaining your quality of life. The key is gradually returning to normal activities without compromising your recovery.
Immediate Restrictions (First 24-48 Hours)
Absolutely Avoid:
Getting stitches wet - No showers, baths, or swimming
Heavy lifting - Nothing over 5-10 pounds
Strenuous exercise - No gym, running, or intense physical activity
Driving - If the incision affects your ability to operate controls safely
Alcohol - Can interfere with healing and interact with medications
What You Can Do:
Light walking around the house
Normal eating and drinking
Desk work or light computer use
Reading and other sedentary activities
Gentle personal care (avoiding the incision area)
Week 1: Gradual Activity Increase
Modified Daily Activities:
Showering and Bathing 🚿
After 24-48 hours, gentle showering is usually okay
Let water run over the area gently - don't direct the stream at stitches
Use mild, unscented soap
Pat dry thoroughly
No baths, hot tubs, or swimming until cleared by your doctor
Work Considerations
Desk jobs: Usually can return in 1-2 days
Physical labor: May need 1-2 weeks off
Jobs requiring lifting: Wait until cleared by your surgeon
Consider work-from-home options if available
Exercise Modifications
Walking: Gentle walking is encouraged and beneficial
Upper body workouts: Avoid if incision is on arms, shoulders, or back
Core exercises: Generally avoid for the first week
Yoga/stretching: Only gentle movements that don't strain the incision
Week 2 and Beyond: Returning to Normal
Progressive Activity Return:
Exercise Timeline:
Week 1: Walking only
Week 2: Light exercise, avoiding movements that stretch the incision
Week 3-4: Gradual return to full exercise routine
After stitch removal: Usually cleared for most activities
Sports and Recreation:
Swimming: Wait until stitches are removed and incision is fully healed
Contact sports: May need 2-4 weeks clearance
Golf/tennis: Depends on incision location and healing progress
Running: Usually okay after first week if incision is stable
Location-Specific Considerations
Facial Cyst Removal:
Be extra gentle with skincare routines
Avoid makeup over the incision initially
Use sunscreen religiously once healed
Sleep with head slightly elevated
Back or Shoulder Removal:
Avoid reaching overhead
No heavy lifting or pushing/pulling
Consider help with household chores
Sleep position modifications may be needed
Scalp Removal:
Gentle hair washing after 48 hours
Avoid hair styling products near the incision
Be careful with combing or brushing
No hair coloring for several weeks
Workplace Accommodations
Temporary Modifications You Might Need:
Adjusted lifting restrictions
Modified duties that avoid repetitive motions
Flexible scheduling for medical appointments
Ergonomic adjustments to reduce strain
Communication with Employers:
Provide clear medical restrictions from your doctor
Discuss temporary accommodations
Plan for follow-up appointments
Keep documentation of your restrictions
Long-Term Lifestyle Considerations
Scar Protection:
Use sunscreen on healed scars for at least a year
Consider silicone scar sheets or gels
Gentle massage once fully healed
Monitor for any changes in appearance
Prevention of Future Cysts:
Maintain good skin hygiene
Avoid tight clothing that causes friction
Address any skin conditions promptly
Regular skin checks for new growths
The medical professionals at our center can provide specific guidance based on your job requirements and lifestyle needs.
Scar Prevention and Minimization
While some scarring after sebaceous cyst removal is inevitable, there are many effective strategies to minimize scar appearance and promote optimal cosmetic healing.
Understanding Scar Formation
The Healing Process: Scar formation occurs in three phases:
Inflammatory Phase (Days 1-5): Initial healing and clot formation
Proliferative Phase (Days 5-21): New tissue growth and collagen production
Maturation Phase (Months 1-12): Scar remodeling and final appearance
Factors Affecting Scar Quality:
Genetics: Some people naturally scar more than others
Age: Younger skin tends to heal with more noticeable scars
Location: Areas with more tension typically scar more
Skin type: Darker skin tones may be more prone to keloid scarring
Care quality: Proper wound care significantly impacts final results
Early Scar Prevention (First 2 Weeks)
Optimal Wound Healing: The foundation of minimal scarring starts immediately:
Keep incisions clean and moist (but not overly wet)
Follow all post-operative instructions precisely
Avoid picking or scratching at stitches or scabs
Protect from trauma and excessive movement
Maintain good nutrition to support healing
Sun Protection ☀️ UV exposure can permanently darken healing scars:
Keep the incision covered when outdoors
Use broad-spectrum SPF 30+ sunscreen once healed
Continue sun protection for at least 6-12 months
Consider protective clothing for large or exposed scars
Active Scar Treatment (After Stitch Removal)
Silicone-Based Products: Silicone is the gold standard for scar treatment:
Silicone Sheets:
Apply to clean, dry skin
Wear 12-24 hours daily for best results
Can be reused for several days
Particularly effective for raised or thick scars
Silicone Gels:
Easier to apply to irregular areas
Good for facial scars
Apply thin layer twice daily
Allow to dry completely before clothing contact
Massage Therapy: Once the incision is fully healed (usually 2-3 weeks):
Use gentle circular motions
Apply light pressure for 5-10 minutes daily
Can use with moisturizer or scar gel
Helps break down scar tissue and improve flexibility
Topical Treatments:
TreatmentHow It WorksBest ForWhen to StartVitamin EAntioxidant propertiesAll scar typesAfter healingOnion extractAnti-inflammatoryRed, raised scars2-3 weeks post-opHydrocortisoneReduces inflammationItchy, raised scarsAs directed by doctorTretinoinPromotes cell turnoverMature scarsSeveral months later
Advanced Scar Treatments
Professional Options: If scars don't respond to home treatment after 6-12 months:
Laser Therapy:
Reduces redness and thickness
Multiple sessions usually needed
Best for mature scars
Requires sun avoidance afterward
Steroid Injections:
Effective for raised, keloid scars
Can flatten and soften thick scars
May require multiple treatments
Risk of skin thinning with overuse
Microneedling:
Stimulates collagen production
Improves texture and appearance
Can be combined with other treatments
Requires professional application
Lifestyle Factors for Better Healing
Nutrition for Optimal Healing: 🥗
Protein: Essential for tissue repair (lean meats, fish, legumes)
Vitamin C: Supports collagen production (citrus, berries, vegetables)
Zinc: Aids in wound healing (nuts, seeds, whole grains)
Hydration: Maintain adequate water intake
Habits That Impair Healing:
Smoking: Significantly delays healing and worsens scarring
Excessive alcohol: Impairs immune function and healing
Poor sleep: Reduces growth hormone production
Stress: Can slow healing and increase inflammation
Realistic Expectations
Timeline for Scar Maturation:
1 month: Initial healing complete, scar may appear red or raised
3 months: Significant improvement in color and texture
6 months: Most improvement visible
12 months: Final scar appearance achieved
What to Expect:
Small cyst removals often heal with minimal scarring
Facial scars typically heal better than body scars
Some visible mark is normal and expected
Complete invisibility is rare but significant improvement is common
For personalized scar management recommendations, consult with our experienced team who can assess your specific situation and healing progress.
Follow-Up Care and When to Contact Your Doctor
Proper follow-up care ensures your recovery stays on track and helps identify any issues before they become serious problems. Knowing when to reach out for professional guidance is crucial for optimal healing.
Virtual Check-Ins: Many providers now offer telemedicine follow-up for wound care:
Take clear photos of the healing incision
Discuss symptoms and concerns via video call
Receive updated care instructions
Determine if in-person visit is needed
Photo Guidelines:
Use good lighting (natural light is best)
Take photos from multiple angles
Include a ruler or coin for size reference
Don't use filters or editing
Send through secure medical platforms only
Preparing for Your Appointments
Before Your Visit:
List any concerns or questions you have
Note any changes in the incision appearance
Bring current medications and any products you're using
Prepare to discuss your activity level and pain
What to Bring:
Insurance cards and identification
List of current medications
Photos of healing progress (if requested)
Any products you've been using for care
Long-Term Monitoring
Self-Assessment Skills: Learn to monitor your own healing:
Daily visual inspection of the incision
Note any changes in color, size, or texture
Track pain levels and improvement
Document any unusual symptoms
When to Schedule Additional Follow-Up:
Concerns about scar appearance after 3-6 months
Development of thick or raised scars
Persistent pain or discomfort
Any new lumps or bumps in the area
Questions about additional treatments
The team at our medical center is always available to address your concerns and ensure your recovery proceeds smoothly. Don't hesitate to reach out with questions - we're here to support your healing journey.
Frequently Asked Questions About Stitches After Sebaceous Cyst Removal
How long do stitches stay in after sebaceous cyst removal?
The duration depends on the location and size of your cyst removal. Facial stitches are typically removed in 5-7 days due to excellent blood supply and cosmetic concerns. Body stitches usually stay in for 7-14 days, with areas like the back requiring longer healing time due to movement and tension.
Can I shower with stitches after cyst removal?
Generally, you should keep stitches dry for the first 24-48 hours. After this initial period, gentle showering is usually permitted. Let water run gently over the area rather than directing the stream at the stitches. Always pat dry thoroughly and avoid soaking in baths, pools, or hot tubs until your doctor gives clearance.
What does normal healing look like?
Normal healing includes mild swelling and pink or light red coloration around the incision that gradually fades. You may notice small amounts of clear or slightly bloody drainage initially. The area should become less tender each day, and any bruising should begin to fade within the first week.
When should I be concerned about my stitches?
Contact your healthcare provider immediately if you notice increasing redness that spreads beyond the incision, red streaking, pus or foul-smelling drainage, fever over 101°F, or pain that worsens rather than improves. These could be signs of infection requiring prompt treatment.
Will I have a scar after sebaceous cyst removal?
Some scarring is normal after any surgical procedure. However, proper wound care, sun protection, and following post-operative instructions can significantly minimize scar appearance. Most scars fade considerably over 6-12 months, and many become barely noticeable with proper care.
Can I exercise with stitches?
Avoid strenuous exercise for the first week after surgery. Light walking is encouraged as it promotes healing. After the first week, you can gradually return to normal activities as tolerated, but avoid movements that stretch or strain the incision until stitches are removed and your doctor clears you for full activity.
What happens if a stitch breaks or comes loose?
If one stitch breaks or comes loose, don't panic. Contact your healthcare provider to determine if it needs to be replaced or if the remaining stitches are sufficient. Keep the area clean and covered, and avoid activities that might stress the incision further.
How do I know if my stitches are ready to come out?
Your surgeon will determine the appropriate timing based on healing progress during your follow-up appointment. Signs that stitches are ready for removal include well-closed incision edges, minimal tenderness, and adequate healing time for your specific location and situation.
Conclusion
Caring for stitches after sebaceous cyst removal doesn't have to be overwhelming when you have the right information and approach. The key to successful healing lies in following your surgeon's specific instructions, maintaining consistent daily care, and knowing when to seek professional guidance.
Remember that proper stitch care during the first two weeks sets the foundation for optimal healing and minimal scarring. Keep the area clean and dry, watch for signs of normal healing versus complications, and don't hesitate to contact your healthcare provider with any concerns.
Your Next Steps:
Follow your personalized care instructions from your surgical team
Establish a daily cleaning routine and stick to it consistently
Schedule and attend all follow-up appointments as recommended
Start planning for scar care once your stitches are removed
Contact your provider immediately if you notice any warning signs
Most patients heal beautifully from sebaceous cyst removal with minimal long-term effects. By taking an active role in your recovery and following evidence-based care practices, you're setting yourself up for the best possible outcome.
For additional questions about post-surgical care or to schedule a consultation, visit our website or contact our experienced medical team who can provide personalized guidance for your specific situation.
October 2, 2025
🇨🇦
Our clinic currently provides care to patients within
Canada only.
We apologize for any inconvenience this may cause.