How to Heal Helix Piercing Bump: A Comprehensive 2025 Guide
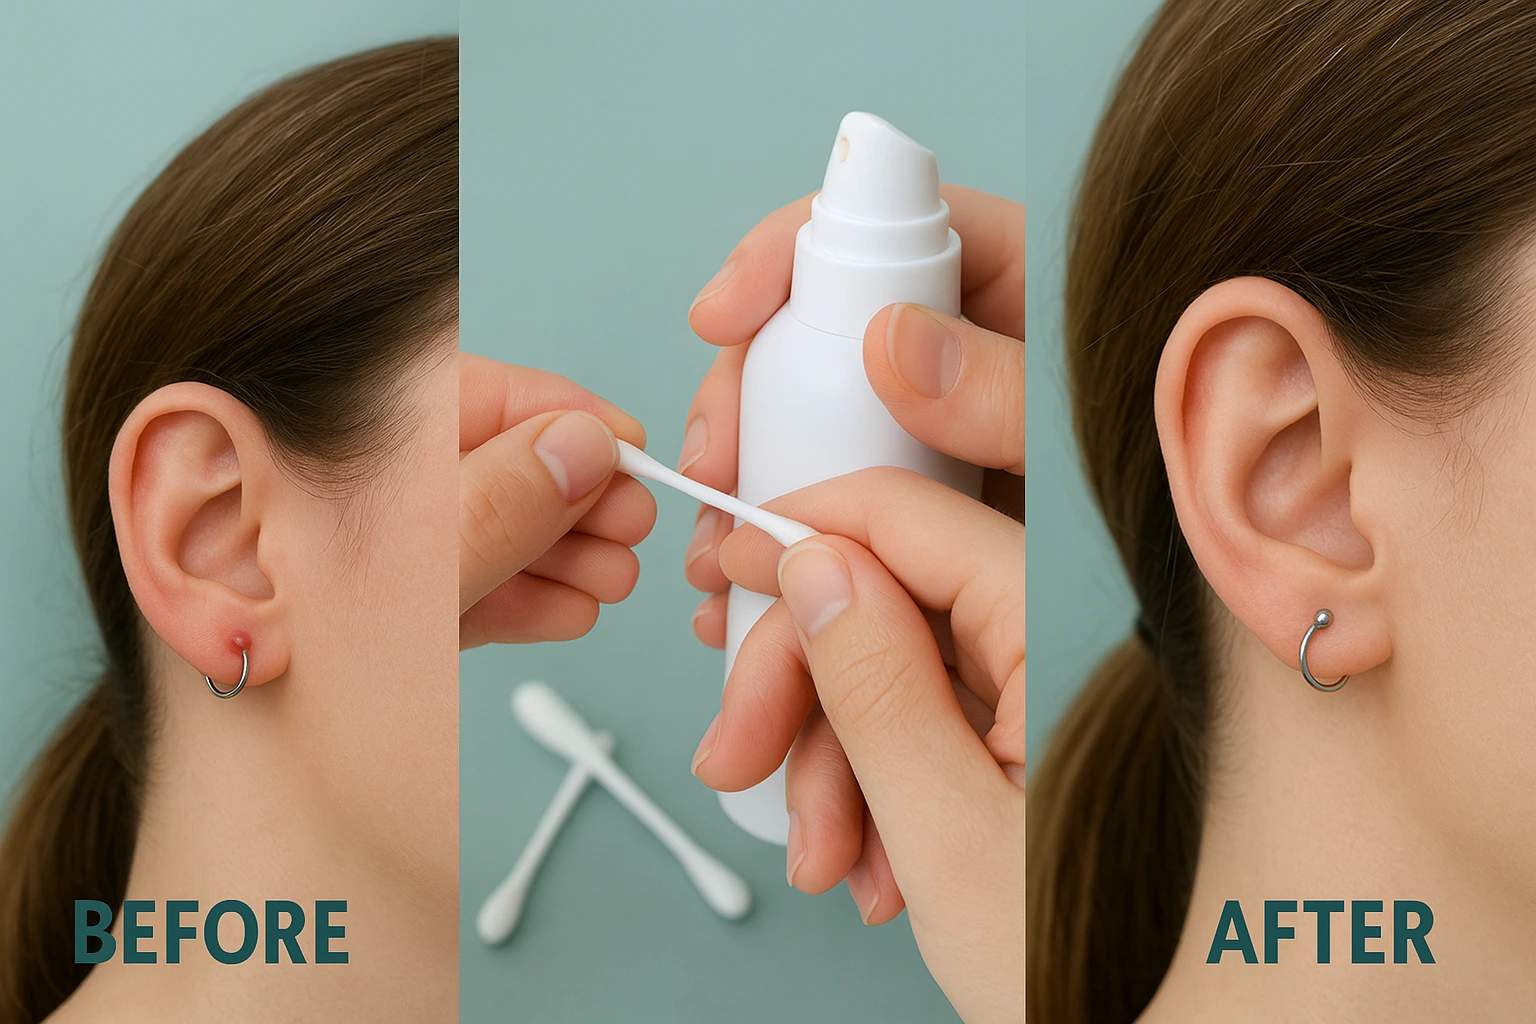
Getting a helix piercing can be an exciting way to express personal style, but sometimes, the healing journey takes an unexpected turn. One of the most common and frustrating issues new (and even experienced) piercing enthusiasts face is the development of a helix piercing bump. These small, often red or flesh-colored protrusions can be a source of discomfort, concern, and can impede the healing process. Understanding how to heal helix piercing bump is crucial for anyone experiencing this issue. This authoritative guide will delve deep into the causes, types, and most effective strategies for treating and preventing these bothersome bumps, ensuring your helix piercing heals beautifully in 2025.
Bumps on a helix piercing are typically a sign of irritation or a complication in the healing process. While they can be alarming, most are treatable with proper care and patience. This article aims to equip you with the knowledge and actionable steps required to effectively manage and resolve these issues, restoring your piercing to its optimal health.
Key Takeaways
Identify the Type of Bump: Not all bumps are the same; distinguishing between irritation bumps, hypertrophic scars, and keloids is the first step towards effective treatment.
Prioritize Proper Aftercare: Strict adherence to a gentle cleaning routine with saline solution is fundamental for all healing piercings and bumps.
Evaluate Jewelry Quality and Fit: Ill-fitting, low-quality, or inappropriate jewelry is a major contributor to irritation and bump formation.
Avoid Touching and Trauma: Minimize contact with the piercing, including twisting, snagging, or sleeping on it, to prevent further irritation.
Seek Professional Advice: If a bump persists, worsens, or is accompanied by signs of infection, consult a professional piercer or healthcare provider.
Understanding Helix Piercing Bumps: Identification and Causes
When you notice an unsightly lump forming around your helix piercing, your immediate thought is likely, "how to heal helix piercing bump?" Before diving into solutions, it's vital to understand what you're dealing with. Not all bumps are created equal, and their underlying causes can vary significantly. Accurate identification is the first step toward effective treatment.
Types of Helix Piercing Bumps
There are primarily three types of bumps that can appear on a helix piercing: irritation bumps, hypertrophic scars, and keloids. Each has distinct characteristics and requires a slightly different approach.
1. Irritation Bumps (Granulomas)
Appearance: These are the most common type of piercing bump. They are typically small, red, and swollen, often appearing within weeks or months of the piercing. They can be tender to the touch and might ooze a clear or yellowish fluid, which is usually lymph, not pus.
Feel: Soft and movable.
Causes: Almost always a direct response to trauma or irritants. Common causes include:
Poor Aftercare: Using harsh chemicals (alcohol, hydrogen peroxide), over-cleaning, or not cleaning enough.
Trauma: Snagging the jewelry on clothing, hair, or towels; sleeping on the piercing; accidental knocks.
Jewelry Issues: Low-quality materials (nickel alloys), ill-fitting jewelry (too tight or too loose), or inappropriate styles (hoops in a fresh piercing).
Moisture Buildup: Not drying the piercing properly after cleaning can create a breeding ground for bacteria.
Pressure: Continuous pressure on the piercing, often from headphones or sleeping.
2. Hypertrophic Scars
Appearance: These bumps are a type of raised scar tissue that forms within the boundaries of the original wound. They are usually flesh-colored, pink, or slightly red, and can appear months after the initial piercing. They are generally firmer than irritation bumps.
Feel: Firm, rubbery, and can be itchy.
Causes: Similar to irritation bumps, hypertrophic scars are often a response to prolonged irritation, trauma, or genetic predisposition. They are essentially an overproduction of collagen during the healing process. They are more common in cartilage piercings like the helix.
3. Keloids
Appearance: Keloids are a less common, but more severe type of raised scar. Unlike hypertrophic scars, keloids grow beyond the original boundaries of the wound, forming a smooth, firm, often shiny, and irregularly shaped growth. Their color can range from pink to red to dark brown.
Feel: Hard and rubbery.
Causes: Keloids are primarily genetic. If you or a family member have a history of keloid scarring, you are more susceptible. They can form after any skin trauma, including piercings, and are less related to specific piercing aftercare mistakes. They can appear months or even years after the piercing.
Distinction: It's crucial to differentiate keloids from other bumps. While irritation bumps and hypertrophic scars typically respond well to improved aftercare, keloids often require medical intervention and can be challenging to treat.
"Understanding the specific type of bump on your helix piercing is the foundational step in determining the most effective course of action. Misdiagnosis can lead to ineffective treatments and prolonged healing."
Common Causes of Helix Piercing Bumps
While specific bump types have their nuances, several factors commonly contribute to the development of any bump on a helix piercing. Addressing these underlying issues is key to learning how to heal helix piercing bump.
Trauma and Snagging: The helix is exposed and prone to accidental bumps from hairbrushes, clothing, towels, or even just fidgeting. Each trauma event can irritate the delicate healing tissue and trigger a bump.
Sleeping on the Piercing: Applying constant pressure to a healing piercing while sleeping is one of the most significant culprits. This can cause the jewelry to embed, shift, and irritate the piercing channel.
Inappropriate Jewelry:
Material: Nickel, often found in cheaper jewelry, is a common allergen and irritant. Opt for implant-grade materials like titanium, surgical stainless steel, niobium, or 14k/18k gold.
Size/Fit: Jewelry that is too tight can embed and restrict blood flow, while jewelry that is too loose can move excessively, causing friction. Initial jewelry should have extra length for swelling, but once swelling subsides, it should be downsized by a professional piercer.
Style: Rings (hoops) can rotate and cause continuous irritation in a fresh helix piercing. Flat-back labrets are generally recommended for initial helix piercings.
Poor Aftercare Practices:
Over-cleaning: Cleaning too frequently or too vigorously can strip the piercing of natural oils, leading to dryness and irritation.
Under-cleaning: Not cleaning enough allows for crust buildup, which can harbor bacteria and impede healing.
Harsh Cleaning Agents: Products like alcohol, hydrogen peroxide, tea tree oil (undiluted), Neosporin, or homemade salt solutions can be too harsh and dry out the piercing, causing more harm than good.
Touching/Twisting: Hands carry bacteria, and twisting the jewelry can introduce dirt into the piercing channel and disrupt the healing tissue.
Moisture Trapping: Keeping the piercing area damp can lead to bacterial growth. Always gently pat the area dry with a clean paper towel after showering or cleaning.
Systemic Factors:
Stress: High stress levels can affect the body's healing capabilities.
Nutrition: A poor diet can hinder overall healing.
Hydration: Staying well-hydrated supports healthy skin and tissue repair.
Immune System: A compromised immune system can prolong healing.
Allergic Reactions: While less common than irritation from nickel, some individuals can have sensitivities to certain jewelry materials.
Infection (less common cause of bumps, but a serious complication): While a bump itself isn't necessarily an infection, an infected piercing can sometimes present with swelling and a bump-like appearance. Signs of infection include intense pain, warmth, redness spreading from the piercing site, significant swelling, thick green/yellow pus, and fever. If you suspect an infection, seek medical attention immediately.
Understanding these causes empowers you to take the right steps in addressing your helix piercing bump. Often, simply identifying and eliminating the irritant is enough to see significant improvement.
Effective Strategies for Healing Helix Piercing Bumps
Once you've identified the type of bump and potential causes, the next crucial step is implementing effective strategies to encourage healing. The good news is that most helix piercing bumps, especially irritation bumps and hypertrophic scars, respond well to consistent, gentle care. For those wondering how to heal helix piercing bump, consistency and patience are your best allies.
1. Reassess Your Aftercare Routine
This is often the first and most impactful step. A flawed aftercare routine is a leading cause of piercing bumps.
The Gold Standard: Saline Solution
Product: Use a sterile saline solution specifically designed for wound care. These typically contain 0.9% sodium chloride and purified water. Brands like NeilMed Piercing Aftercare Mist are highly recommended by professional piercers. Avoid homemade salt solutions as they are difficult to get right and can be too concentrated, causing more irritation.
Method:
Wash Hands: Always wash your hands thoroughly with antibacterial soap before touching your piercing or its surrounding area.
Spray/Soak: Gently spray the front and back of your piercing with the saline solution. Alternatively, you can soak a clean gauze pad or paper towel in saline and hold it over the piercing for 5-10 minutes.
Remove Crusties: If there are any crusts, they should soften and come off during the cleaning. Do not pick at them. If they don't come off easily, leave them be.
Dry Thoroughly: Gently pat the area completely dry with a clean paper towel or allow it to air dry. Moisture can harbor bacteria.
Frequency: Clean 1-2 times a day. More is not better; over-cleaning can irritate the piercing further.
What to AVOID:
Harsh Chemicals: Absolutely no alcohol, hydrogen peroxide, tea tree oil (undiluted), Neosporin, or antibiotic ointments. These products are too harsh for a healing piercing and can impede cell regeneration, causing more irritation and delaying healing.
Twisting/Rotating Jewelry: This is an outdated practice. It disrupts the healing tissue, introduces bacteria, and can cause irritation bumps. Leave the jewelry alone.
Picking/Touching: Keep your hands off! Your hands carry bacteria and any unnecessary contact can introduce pathogens or cause trauma.
Cotton Swabs/Balls: Fibers from these can get caught in the jewelry and irritate the piercing. Stick to sterile gauze or paper towels.
2. Evaluate Your Jewelry
Jewelry is a critical factor in the healing process. If you have a bump, your jewelry might be the culprit.
Material: Ensure your jewelry is made from implant-grade materials. The best options include:
Implant-Grade Titanium (ASTM F-136): Hypoallergenic and widely recommended.
Surgical Stainless Steel (316L or 316LVM): A common, generally safe option, but some people are sensitive to trace nickel.
Niobium: Another excellent hypoallergenic choice.
14k or 18k Gold: Solid gold, not plated. Be aware of nickel content in lower karat gold.
Fit:
Length: If your jewelry is too short, it can embed in the tissue, causing swelling and irritation. If it’s too long, it can snag and move excessively, leading to trauma. A professional piercer should have downsized your initial jewelry after the initial swelling subsided (typically 4-8 weeks). If your jewelry is still too long or too short, visit your piercer for a proper assessment and change.
Style: For a healing helix piercing, a flat-back labret stud is usually preferred over a ring or hoop. Rings tend to move more, causing constant friction and irritation, which can easily lead to bumps. Once the piercing is fully healed (6-12+ months), you can consider switching to a ring.
Professional Assistance: Do not attempt to change jewelry yourself, especially if a bump is present. Visit your piercer. They can assess the bump, recommend appropriate jewelry, and perform a sterile change.
3. Minimize Trauma and Pressure
Protecting your piercing from physical trauma is paramount to learning how to heal helix piercing bump.
Sleeping: The most common source of trauma.
Donut Pillow/Travel Pillow: Sleep with your ear in the hole of a donut-shaped pillow or a travel pillow to keep pressure off the piercing.
Side Sleeping: If you're a side sleeper, try to sleep on the opposite side. If that's not possible, the donut pillow is essential.
Hair: Keep hair pulled back, especially long hair, to prevent it from snagging on the jewelry or trapping moisture.
Headphones/Earbuds: Avoid over-ear headphones that press on your helix. If you use earbuds, ensure they don't press directly on the piercing.
Hats/Helmets: Be mindful when putting on or removing hats or helmets.
Towels: Use a soft, clean paper towel to gently pat dry, rather than rubbing with a cloth towel that can snag.
Hair Styling: Be extra careful with hair products (hairspray, mousse) as they can irritate the piercing. Cover your ear if necessary.
4. Lifestyle and Health Considerations
Your overall health plays a significant role in your body's ability to heal.
Hydration: Drink plenty of water to support healthy cell function.
Nutrition: Eat a balanced diet rich in vitamins and minerals to boost your immune system and aid healing.
Stress Management: High stress levels can impact healing. Find ways to relax and reduce stress.
Avoid Alcohol and Nicotine: These substances can impair blood flow and slow down the healing process.
5. Specific Approaches for Different Bump Types
For Irritation Bumps:
Identify and Eliminate the Irritant: This is the most crucial step. Once the source of irritation (e.g., poor jewelry, trauma, improper aftercare) is removed, irritation bumps often shrink and disappear on their own within a few weeks.
Saline Compresses: Regular saline soaks (warm compress with saline) can help reduce inflammation and clean the area gently.
Patience: These bumps take time to resolve. Stick to your revised aftercare routine and avoid trying to pop or squeeze them.
For Hypertrophic Scars:
Similar to Irritation Bumps: Treatment often follows the same principles: eliminate irritation, use proper aftercare, and ensure appropriate jewelry.
Massage (Once Inflammation Subsides): Once the initial irritation has calmed down, very gentle massage with a clean finger (or a drop of jojoba oil if recommended by your piercer) might help break down scar tissue, but only if the piercing is no longer actively irritated. Consult your piercer before attempting this.
Silicone Scar Sheets/Gel: For persistent hypertrophic scars, your piercer or doctor might suggest silicone scar treatment, which can help flatten raised scars over time.
For Keloids:
Medical Intervention: If you suspect a keloid, it's essential to consult a dermatologist or healthcare professional. Piercers cannot treat keloids.
Treatment Options (Medical): These can include steroid injections, laser therapy, cryotherapy (freezing), surgical removal (often followed by other treatments to prevent recurrence), or silicone sheets. These treatments are outside the scope of piercing aftercare and must be managed by a medical professional.
Prevention: If you have a history of keloids, it's generally advised to avoid piercings that penetrate cartilage, as these are more prone to keloid formation.
6. When to Seek Professional Help
Knowing how to heal helix piercing bump also means knowing when to get expert advice.
Professional Piercer:
If the bump doesn't improve after a few weeks of diligent care.
If you suspect your jewelry is the wrong material, size, or style.
If you are unsure about the type of bump.
For safe jewelry changes.
Healthcare Provider/Dermatologist:
If you suspect an infection (spreading redness, intense pain, fever, thick green/yellow pus).
If the bump is large, rapidly growing, extremely painful, or shows no signs of improvement with diligent aftercare.
If you suspect a keloid.
Never hesitate to seek professional advice. A qualified piercer can offer invaluable insights and assistance, and a doctor can rule out infections or provide medical treatment for more severe scar tissue.
Preventing Helix Piercing Bumps in 2025
The best way to deal with a helix piercing bump is to prevent it from forming in the first place. Adopting a proactive approach from the moment you get your piercing can significantly reduce your risk. As we move through 2025, understanding modern best practices for piercing aftercare and prevention is crucial.
1. Choose a Reputable Piercer and Quality Jewelry
This is arguably the most critical preventive step.
Research Your Piercer:
Experience and Certification: Look for piercers with extensive experience, proper licensing, and who are members of professional organizations like the Association of Professional Piercers (APP) [^1].
Sterilization Practices: Observe their studio. Is it clean? Do they use sterile, single-use needles and proper sterilization equipment (autoclave)?
Knowledge: A good piercer will educate you on aftercare, jewelry options, and potential complications.
Initial Jewelry Selection:
Material: Insist on implant-grade materials like titanium (ASTM F-136), niobium, or 14k/18k solid gold. Avoid cheap mystery metals.
Style: For a new helix piercing, a straight barbell or a flat-back labret stud is usually recommended over a hoop. Hoops move more and can cause unnecessary irritation during the delicate healing phase.
Size: The initial jewelry should be long enough to accommodate swelling, but not excessively long. Your piercer should explain the importance of "downsizing" later.
2. Master Your Aftercare Routine from Day One
Consistent and gentle aftercare is the cornerstone of preventing bumps.
Sterile Saline Solution: Use only a pre-made, sterile saline wound wash (0.9% sodium chloride and purified water). Apply 1-2 times daily.
Hands Off: Resist the urge to touch, twist, or fiddle with your piercing. Your hands carry bacteria and can introduce trauma.
Dry Thoroughly: After cleaning or showering, gently pat the piercing dry with a clean paper towel. Do not leave it damp.
Shower Smart: Allow clean water to run over the piercing in the shower. Avoid using harsh soaps, shampoos, or conditioners directly on the piercing. If products accidentally get on it, rinse thoroughly.
3. Protect Your Piercing from Trauma
Physical irritation is a prime cause of bumps.
Sleep Consciously: This is paramount. Invest in a donut pillow or travel pillow and sleep with your ear in the hole to prevent pressure on the piercing. Try to sleep on your back or the un-pierced side.
Hair Management: If you have long hair, keep it tied back to prevent snagging on your jewelry. Be cautious when brushing or styling your hair.
Headwear and Accessories: Avoid hats, headbands, or headphones that press directly on your helix piercing.
Towels: Use paper towels or a very clean, soft cloth to pat the area dry instead of rubbing vigorously.
Avoid Contact Sports: Or any activities where your piercing might get bumped or snagged during the initial healing period.
4. Downsize Your Jewelry at the Right Time
Initial Swelling: Your initial jewelry is deliberately longer to account for swelling.
The Importance of Downsizing: Once the initial swelling subsides (typically 4-8 weeks for a helix), it's crucial to visit your piercer to have the jewelry "downsized." This means replacing the longer post with a shorter one that fits snugly, but not tightly.
Why it Prevents Bumps: Overly long jewelry can snag easily, move excessively, and create leverage that irritates the piercing channel, contributing significantly to bump formation. Downsizing reduces this movement and trauma. Do not attempt to downsize yourself.
5. Maintain General Health and Hygiene
Your body's ability to heal is directly linked to your overall health.
Stay Hydrated and Eat Well: Support your immune system and healing process with a balanced diet and adequate water intake.
Manage Stress: High stress levels can affect your body's healing capabilities.
Avoid Irritants: Minimize exposure to smoke, excessive alcohol, and recreational drugs, as these can impair healing.
Clean Bedding: Change your pillowcases regularly, especially during the initial healing phase, to minimize bacterial exposure.
6. Be Patient and Realistic About Healing Times
Helix piercings, being cartilage piercings, take a significant amount of time to heal fully.
Healing Timeline: Expect 6-12 months, or even longer, for a helix piercing to be fully healed [^2]. It may look fine on the outside, but the inside of the piercing channel needs time to mature.
Don't Rush Jewelry Changes: Resist the urge to change your jewelry to a hoop or a different style until your piercer confirms the piercing is fully healed. Changing too early is a common cause of bumps.
By diligently following these preventive measures, you can significantly reduce the likelihood of developing a helix piercing bump and enjoy a smoother, healthier healing journey. For those exploring comprehensive financial planning that extends to lifestyle investments like piercings, understanding responsible financial decisions is key. Learn more about navigating various financial aspects at Everything Mortgages.
Advanced Treatments and Considerations
While basic aftercare, jewelry adjustments, and trauma prevention resolve most helix piercing bumps, some cases might require more advanced intervention or specific considerations. This section explores these scenarios, offering further guidance on how to heal helix piercing bump when standard methods fall short.
Advanced Piercing Techniques and Materials
Even beyond the initial piercing, continuous innovation in piercing practices offers advantages in healing and preventing bumps.
Internally Threaded/Threadless Jewelry: These types of jewelry are superior to externally threaded options. Externally threaded jewelry has threads on the post that can scrape and irritate the delicate piercing channel during insertion and removal. Internally threaded or threadless jewelry has a smooth post, significantly reducing trauma. Your piercer should exclusively use these types.
Mirrored Finish: High-quality jewelry should have a mirror-like finish, free of microscopic imperfections that can harbor bacteria or irritate the skin.
Jewelry Anatomy: A skilled piercer considers the specific anatomy of your ear to choose the ideal placement and jewelry for optimal healing and aesthetics. Poor placement can lead to chronic irritation regardless of aftercare.
Addressing Stubborn Hypertrophic Scars
If a hypertrophic scar persists despite diligent aftercare and jewelry adjustments, several options can be explored with professional guidance.
Silicone Therapy: Medical-grade silicone sheets or gels are often recommended for hypertrophic scars. These can be applied daily and work by hydrating the scar tissue, reducing collagen production, and flattening the scar over several weeks to months. Consult a piercer or dermatologist for product recommendations and application instructions.
Compression Discs: For some bumps, a tiny, sterile silicone or plastic disc might be placed on the jewelry, pressing gently against the bump. This constant, gentle pressure can help reduce the bump over time. This should only be done by a professional piercer, as incorrect application can cause more harm.
Low-Dose Steroid Injections: In rare, persistent cases of hypertrophic scarring, a dermatologist might recommend a localized, low-dose corticosteroid injection directly into the scar. This can help reduce inflammation and shrink the scar tissue. This is a medical procedure and not something a piercer can perform.
When a Bump is More Than Just a Bump: Signs of Infection
While irritation bumps are common, it's crucial to distinguish them from an actual infection, which requires immediate medical attention. Knowing how to heal helix piercing bump also means knowing when a bump is a symptom of something more serious.
SymptomIrritation BumpInfection (Seek Medical Help)PainMild tendernessSevere, throbbing, constant painRednessLocalized around the piercingSpreading redness, streaks radiating from the piercingSwellingLocalized, around the bumpSignificant swelling of the entire ear or surrounding tissueDischargeClear or yellowish lymph, sometimes crustyThick, foul-smelling green, yellow, or grey pusWarmthSlight warmth around the bumpNoticeable warmth radiating from the piercingFever/ChillsAbsentPresent, indicates systemic infectionLymph NodesNormalSwollen, tender lymph nodes (neck/jaw)
If you experience any symptoms indicative of infection, do not remove the jewelry unless advised by a medical professional. Removing the jewelry from an infected piercing can trap the infection inside the tissue, potentially leading to an abscess. Consult a doctor immediately.
Understanding the Role of Diet and Lifestyle
Beyond the immediate piercing site, your general health significantly impacts healing.
Nutrition for Healing: A diet rich in protein, Vitamin C (for collagen production), Zinc (for tissue repair), and other essential nutrients can bolster your immune system and accelerate healing.
Hydration: Water is vital for cell function and waste removal. Adequate hydration supports healthy skin and efficient healing.
Smoking and Alcohol: Both smoking and excessive alcohol consumption impair blood flow and immune function, significantly prolonging healing times and increasing the risk of complications, including bumps.
Stress: Chronic stress can suppress the immune system, making your body less effective at healing and fighting off potential issues.
Sleep: Sufficient sleep is essential for bodily repair and regeneration.
Maintaining a healthy lifestyle is a holistic approach to answering how to heal helix piercing bump effectively. Sometimes, even small improvements in these areas can make a difference.
For individuals looking into holistic approaches to their well-being, including financial health, resources on managing expenses and investments can be found. For instance, understanding how economic factors might influence your personal finances could be as important as proper piercing care for overall peace of mind.
The Myth of Tea Tree Oil and Other Home Remedies
While many online sources suggest using tea tree oil, aspirin pastes, or other home remedies for piercing bumps, professional piercers and dermatologists strongly advise against them.
Tea Tree Oil: While it has antiseptic properties, undiluted tea tree oil is a potent irritant. Applying it directly to a healing wound can cause severe dryness, chemical burns, and significantly worsen irritation bumps, prolonging healing. If used very diluted (e.g., 1 drop in a cup of saline), it might be less harmful, but sterile saline remains the safest and most effective option.
Aspirin Paste: Aspirin is an acid. Applying it as a paste to a piercing can cause chemical burns, damage healthy tissue, and lead to further irritation or even a larger bump.
Other Remedies (e.g., Epsom Salts, Castor Oil): These lack scientific evidence for efficacy in piercing aftercare and can often do more harm than good by introducing new irritants or drying agents.
Stick to the advice of your piercer and sterile saline solution. When it comes to healing a helix piercing bump, simplicity and gentle care are almost always the most effective approach.
Long-Term Piercing Care and Maintenance
Even after a bump resolves and your helix piercing is fully healed, continued care is important.
Regular Cleaning: While not as frequent as during healing, occasional cleaning with saline solution can help maintain hygiene.
Quality Jewelry: Continue to wear high-quality, appropriate jewelry to prevent irritation from poor materials or ill-fitting pieces.
Mindful Habits: Be aware of habits like fidgeting with your jewelry, and continue to protect your piercing from unnecessary trauma.
Professional Check-ups: Consider occasional check-ups with your piercer, especially if you plan to change jewelry styles or experience any minor irritation.
Understanding these advanced considerations and being vigilant about your piercing's health can provide a comprehensive answer to how to heal helix piercing bump and prevent future occurrences. Remember, patience, professionalism, and proper care are the cornerstones of a successful healing journey. If you're managing complex financial situations that require similar expert guidance, exploring options with a trusted advisor, such as those featured at Everything Mortgages Agents, can provide tailored solutions.
Conclusion
Navigating the journey of a new helix piercing can be incredibly rewarding, but the appearance of a bump can undoubtedly be a disheartening setback. The question of how to heal helix piercing bump is one of the most common concerns for piercing enthusiasts. This comprehensive guide has explored the various types of bumps, their underlying causes, and a robust array of strategies for effective treatment and prevention in 2025.
The key takeaway is that most helix piercing bumps, particularly irritation bumps and hypertrophic scars, are highly treatable with consistency, patience, and adherence to proper aftercare. The foundation of successful healing lies in:
Accurate Identification: Knowing whether you're dealing with an irritation bump, a hypertrophic scar, or a keloid guides your treatment plan.
Meticulous Aftercare: Utilizing sterile saline solution 1-2 times daily, avoiding harsh chemicals, and keeping your hands off are paramount.
Appropriate Jewelry: Ensuring your jewelry is made of implant-grade material (like titanium), is the correct size, and is a suitable style (e.g., a flat-back labret for initial healing) is critical.
Trauma Prevention: Protecting your piercing from snags, bumps, and constant pressure (especially while sleeping) is essential for uninterrupted healing.
Remember, patience is not just a virtue but a necessity when healing any piercing, especially cartilage piercings like the helix, which can take 6-12 months or longer to fully mature. Avoid the temptation of aggressive home remedies, as these often exacerbate the problem rather than solve it.
Actionable Next Steps:
Re-evaluate Your Routine: Immediately review your current aftercare practices against the recommended guidelines.
Inspect Your Jewelry: If you suspect your jewelry is the wrong material, size, or style, schedule an appointment with a professional piercer for an assessment and potential change.
Prioritize Protection: Implement strategies to prevent trauma, such as using a donut pillow for sleeping and being mindful of hair and accessories.
Observe and Monitor: Keep a close eye on the bump. Most irritation bumps show improvement within a few weeks of eliminating the irritant.
Seek Professional Guidance: Do not hesitate to consult a reputable professional piercer if the bump persists, worsens, or if you're unsure about the type or treatment. If you observe signs of infection (spreading redness, intense pain, fever, thick pus), consult a healthcare provider without delay.
By taking these steps, you empower yourself with the knowledge and tools necessary to effectively address and resolve helix piercing bumps, allowing your piercing to heal beautifully and healthily. Just as carefully planned mortgage strategies can simplify complex financial journeys, as discussed on everythingmortgages.ca, thoughtful and consistent care is the blueprint for a successful piercing experience.
References:
[^1]: Association of Professional Piercers. Aftercare Guidelines. Retrieved from https://www.safepiercing.org/aftercare.php [^2]: Elayne Angel. The Piercing Bible: The Definitive Guide to Safe Piercing. Ten Speed Press, 2009.
December 10, 2025
🇨🇦
Our clinic currently provides care to patients within
Canada only.
We apologize for any inconvenience this may cause.