Hand-Therapy Roadmap After Trigger Finger Release: Your Complete Recovery Guide

Imagine waking up one morning and being unable to straighten your finger—it's stuck in a bent position like a trigger that won't release. This frustrating condition affects millions of people worldwide, and while trigger finger release surgery offers hope, the journey doesn't end in the operating room. The real work begins during recovery, where a structured hand-therapy roadmap can mean the difference between full function and long-term limitations.

Trigger finger release surgery has a success rate of over 95%, but optimal outcomes depend heavily on proper post-operative care and rehabilitation. Without appropriate therapy, patients may experience stiffness, reduced range of motion, or even recurrence of symptoms. This comprehensive guide provides a detailed Hand-Therapy Roadmap After Trigger Finger Release with week-by-week mobility goals, proven swelling management techniques, and critical warning signs that require immediate medical attention.

Key Takeaways

 Create a visual guide in 1024x1024 square format showing re

Structured rehabilitation is essential: Following a week-by-week progression plan significantly improves outcomes and reduces complications after trigger finger release surgery
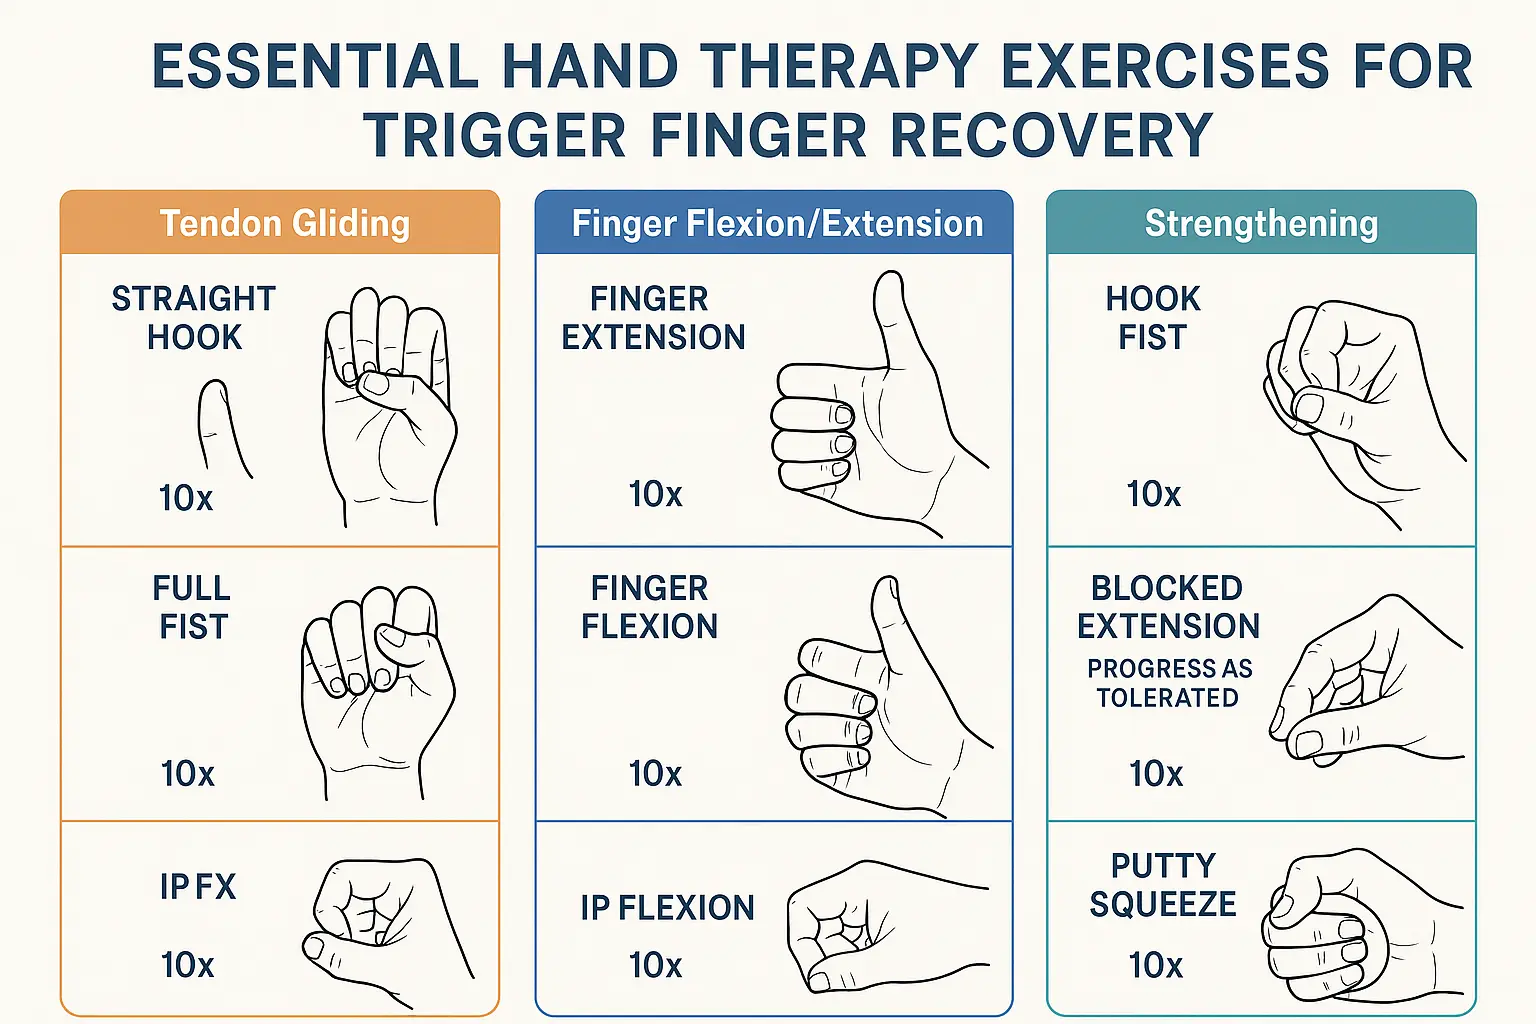
Early gentle movement prevents stiffness: Beginning controlled finger exercises within 24-48 hours helps maintain joint mobility while protecting the surgical site

Swelling management accelerates healing: Implementing proven techniques like elevation, ice therapy, and compression can reduce recovery time by 30-40%

Warning signs require immediate attention: Recognizing red-flag symptoms such as increasing pain, signs of infection, or loss of sensation can prevent serious complications

Professional guidance optimizes results: Working with a certified hand therapist throughout the 6-8 week recovery period ensures proper technique and progression

Understanding Trigger Finger Release Surgery

What Happens During the Procedure

Trigger finger release surgery, also known as tenolysis or A1 pulley release, is a minimally invasive procedure designed to restore smooth tendon movement. During the operation, the surgeon makes a small incision in the palm and cuts the A1 pulley—a tight band of tissue that's been restricting the tendon's movement.

The procedure typically takes 15-20 minutes and can be performed under local anesthesia. Most patients experience immediate relief from the catching or locking sensation, though some swelling and tenderness are normal in the days following surgery.

Types of Surgical Approaches

Open Release Surgery

  • Traditional method with a small incision in the palm
  • Direct visualization of the pulley and tendon
  • Lower risk of incomplete release
  • Slightly longer recovery time

Percutaneous Release

  • Minimally invasive technique using a needle
  • No visible incision
  • Faster initial recovery
  • Slightly higher risk of incomplete release

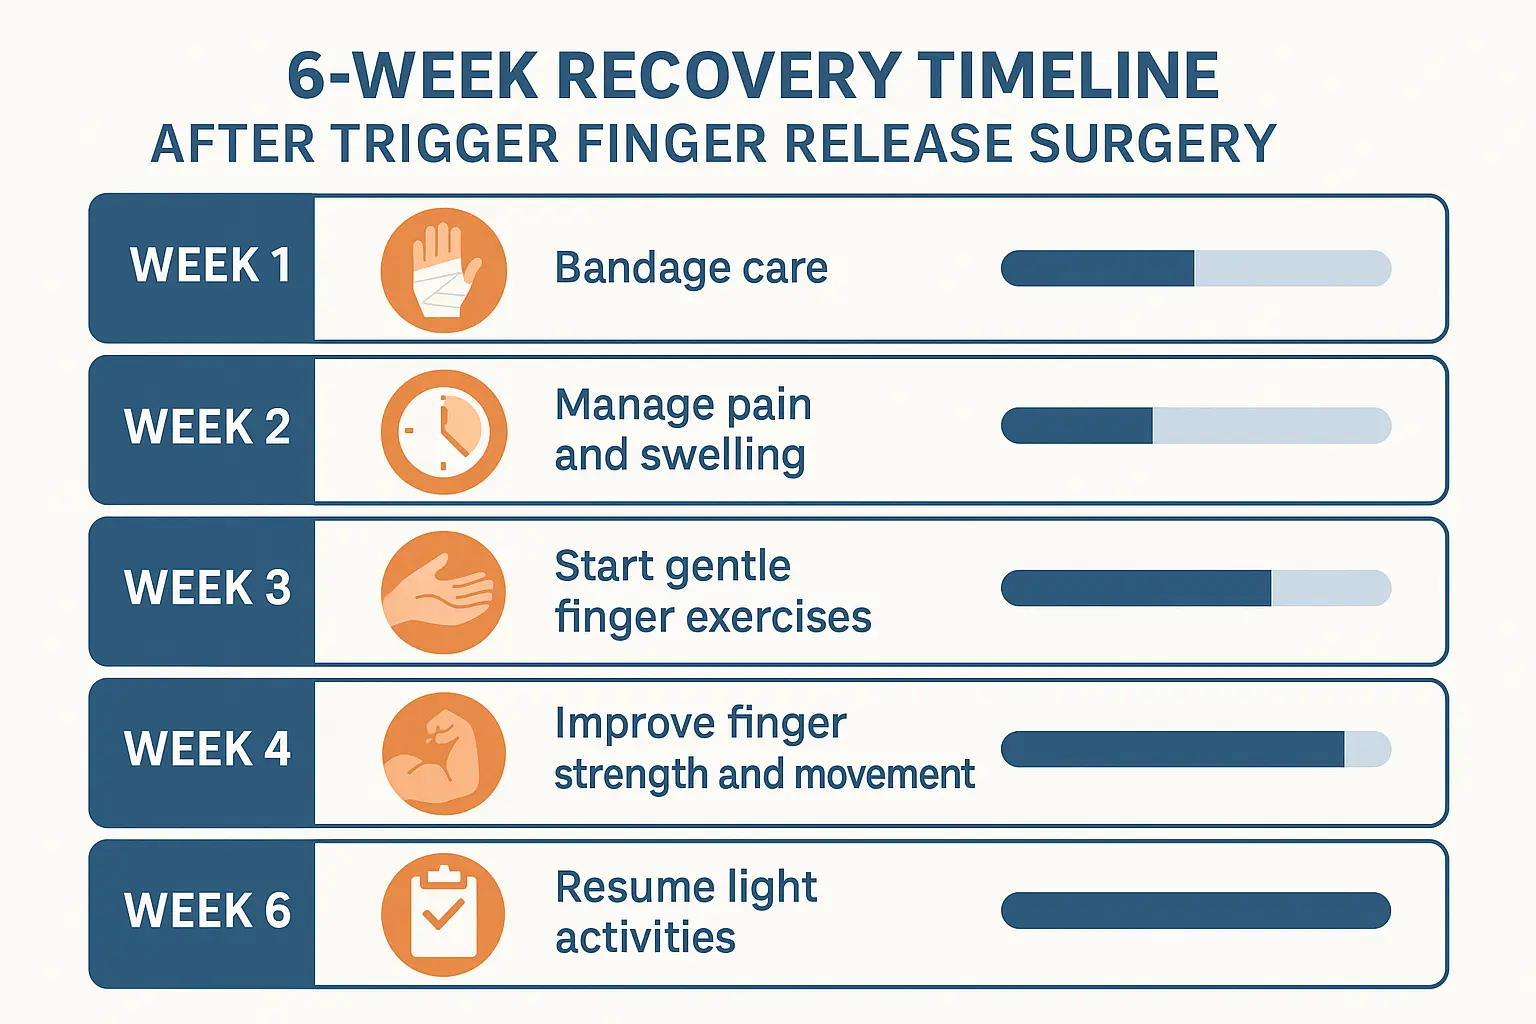
Expected Timeline for Healing

The healing process follows a predictable pattern:

PhaseDurationKey CharacteristicsInflammatoryDays 1-5Swelling, pain, initial wound healingProliferativeDays 5-21Tissue repair, scar formation beginsRemodelingWeeks 3-8Scar maturation, strength building

Week-by-Week Hand-Therapy Roadmap After Trigger Finger Release

Week 1: Immediate Post-Operative Care (Days 1-7)

Primary Goals:

  • Protect the surgical site
  • Manage pain and swelling
  • Begin gentle movement
  • Prevent stiffness in adjacent joints

Daily Activities:

Wound care: Keep dressing clean and dry

Gentle finger flexion: 10-15 repetitions, 3 times daily

Wrist and shoulder movement: Maintain mobility in unaffected joints

Ice therapy: 10-15 minutes every 2-3 hours

Specific Exercises:

  1. Passive finger flexion: Gently bend the operated finger using your other hand
  2. Active extension: Straighten the finger on its own
  3. Tendon gliding: Slowly move from straight to hook fist position
  4. Thumb opposition: Touch thumb to each fingertip (if thumb was operated)

⚠️ Restrictions:

  • No lifting objects heavier than a coffee cup
  • Avoid gripping or pinching activities
  • Keep incision site dry
  • No driving until cleared by surgeon

Week 2: Early Mobilization (Days 8-14)

Primary Goals:

  • Increase range of motion
  • Begin light functional activities
  • Continue swelling management
  • Monitor healing progress

Daily Activities:

Progressive finger exercises: Increase repetitions to 15-20

Light activities of daily living: Writing, typing (if comfortable)

Scar massage: Begin gentle circular motions over healed incision

Heat therapy: Warm soaks for 10 minutes before exercises

Advanced Exercises:

  1. Full fist formation: Progress from hook fist to full fist
  2. Finger abduction/adduction: Spread fingers apart and bring together
  3. Individual finger isolation: Move one finger while keeping others still
  4. Putty exercises: Begin with soft therapy putty for gentle resistance

Expected Progress:

  • 70-80% of normal finger flexion
  • Minimal to no triggering sensation
  • Decreased swelling and tenderness

Week 3: Strengthening Phase (Days 15-21)

Primary Goals:

  • Build grip strength
  • Improve fine motor control
  • Enhance functional capacity
  • Address any developing scar tissue

Daily Activities:

Resistance exercises: Use therapy putty or stress ball

Functional tasks: Buttoning clothes, opening jars (light resistance)

Scar management: Continue massage with moisturizing lotion

Progressive loading: Gradually increase activity demands

Strengthening Protocol:

  1. Grip strengthening: Squeeze therapy putty for 5-10 seconds, 10 repetitions
  2. Pinch exercises: Lateral, tip, and palmer pinch activities
  3. Finger extension: Use rubber bands for resistance
  4. Coordination drills: Pick up small objects, coin manipulation

Functional Milestones:

  • Return to light work activities
  • Comfortable keyboard use
  • Basic household tasks without discomfort

Week 4: Advanced Rehabilitation (Days 22-28)

Primary Goals:

  • Achieve full range of motion
  • Restore normal grip strength
  • Return to most daily activities
  • Prevent long-term complications

Daily Activities:

High-repetition exercises: 20-30 repetitions per exercise

Work simulation: Practice job-specific movements

Sports preparation: Begin sport-specific exercises if applicable

Endurance training: Sustained gripping activities

Advanced Techniques:

  1. Differential tendon gliding: Complex finger movement patterns
  2. Power grip exercises: Progressive resistance training
  3. Dexterity challenges: Pegboard activities, fine manipulation tasks
  4. Plyometric exercises: Quick, explosive finger movements

Weeks 5-6: Return to Full Function

Primary Goals:

  • Complete functional restoration
  • Address any remaining limitations
  • Prepare for discharge from therapy
  • Establish long-term maintenance program

Activities:

  • Full return to work duties
  • Unrestricted recreational activities
  • Normal household responsibilities
  • Sport-specific training (if applicable)

Final Assessment Criteria:

  • ✅ Full pain-free range of motion
  • ✅ 90-100% grip strength compared to unaffected hand
  • ✅ No triggering or catching sensation
  • ✅ Minimal scar tissue formation
  • ✅ Functional independence in all activities
 Design an exercise demonstration chart in 1536x1024 landsca

Proven Swelling Management Techniques

Immediate Post-Operative Swelling Control

The RICE Protocol Enhanced:

🧊 Rest

  • Avoid repetitive gripping for first 48 hours
  • Use affected hand minimally for functional tasks
  • Take frequent breaks during activities

🧊 Ice Application

  • Apply ice pack for 15 minutes every 2-3 hours
  • Use barrier (thin towel) to prevent frostbite
  • Continue for first 3-5 days post-surgery

🧊 Compression

  • Light elastic bandage or compression glove
  • Should feel snug but not restrict circulation
  • Remove if fingers become blue or numb

🧊 Elevation

  • Keep hand above heart level when possible
  • Use pillows to prop up arm while sleeping
  • Maintain elevation during ice application

Advanced Swelling Reduction Strategies

Contrast Therapy (After Week 2):

  1. Warm water bath: 3-4 minutes at 100-104°F
  2. Cold water bath: 1 minute at 55-65°F
  3. Repeat cycle 3-4 times
  4. Always end with cold water
  5. Perform 2-3 times daily

Lymphatic Drainage Techniques:

  • Gentle stroking motions from fingers toward wrist
  • Light pressure—should not cause discomfort
  • Perform for 5-10 minutes, 2-3 times daily
  • Best results when combined with elevation

Natural Anti-Inflammatory Options:

  • Arnica gel: Apply topically 2-3 times daily
  • Turmeric supplements: 500mg daily (consult physician first)
  • Omega-3 fatty acids: Reduce systemic inflammation
  • Adequate hydration: 8-10 glasses water daily

Measuring Swelling Progress

Objective Measurements:

  • Circumference tracking: Measure finger circumference daily
  • Volume displacement: Water displacement method
  • Functional assessment: Ability to make full fist
  • Visual inspection: Color, temperature, texture changes

Expected Timeline:

  • Days 1-3: Peak swelling period
  • Days 4-7: Gradual reduction begins
  • Week 2: 50-70% reduction in swelling
  • Week 3-4: Minimal residual swelling
  • Week 6: Complete resolution

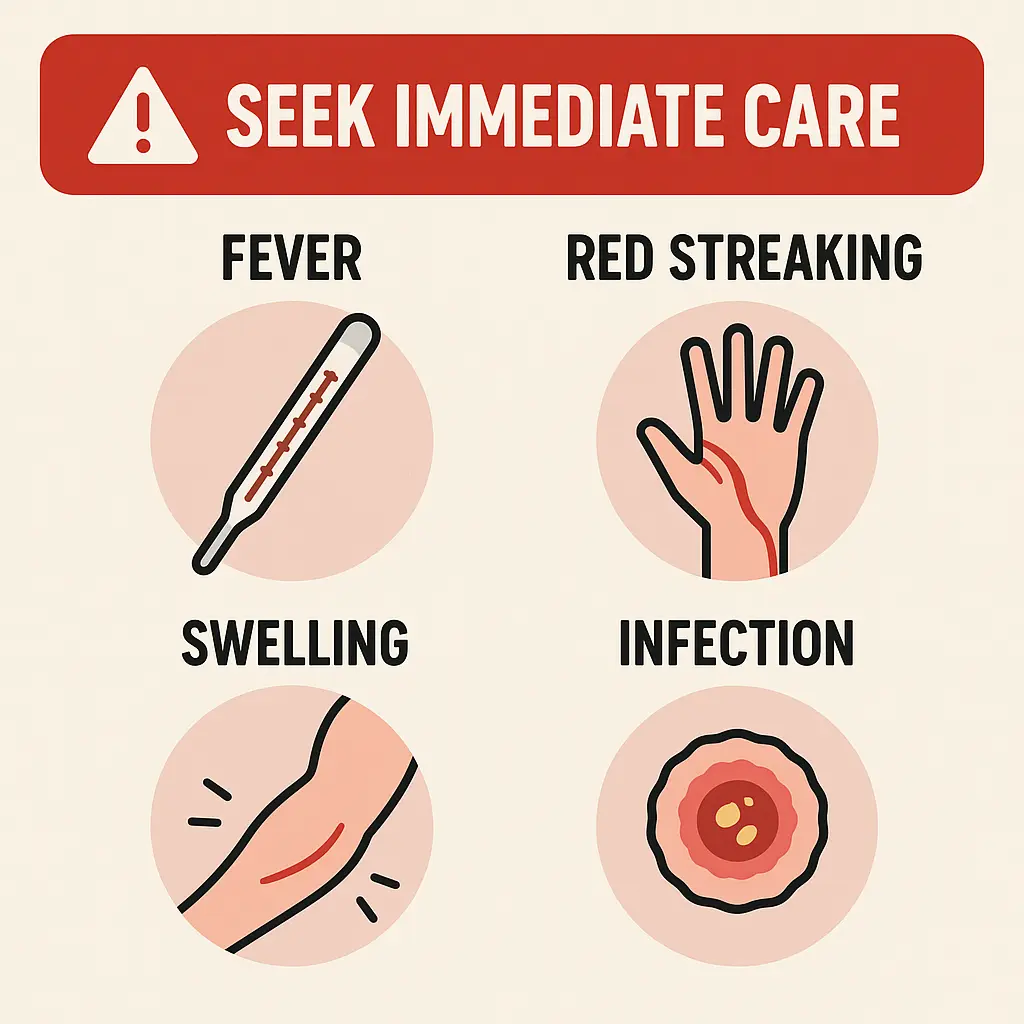
Critical Red-Flag Symptoms Requiring Immediate Medical Attention

Infection Warning Signs 🚨

Immediate Action Required:

  • Fever above 101°F (38.3°C)
  • Red streaking extending from incision site
  • Purulent discharge (pus) from wound
  • Increasing warmth and redness around incision
  • Foul odor from surgical site
  • Systemic symptoms: Chills, nausea, general malaise

Timeline for Concern: Infection typically develops 2-7 days post-surgery. Any signs of infection require immediate medical evaluation as delayed treatment can lead to serious complications including:

  • Deep tissue infection
  • Tendon damage
  • Sepsis
  • Permanent hand dysfunction

Nerve and Vascular Complications

Neurological Red Flags:

  • Numbness or tingling that worsens after initial improvement
  • Loss of sensation in fingertip or palm
  • Weakness beyond expected post-surgical limitations
  • Burning pain that increases rather than decreases
  • Color changes indicating nerve damage

Vascular Warning Signs:

  • Persistent blue or white discoloration
  • Extremely cold finger
  • Absent pulse in digital arteries
  • Prolonged capillary refill (>3 seconds)
  • Severe, throbbing pain not relieved by medication

Healing Complications

Wound Healing Issues:

  • Dehiscence: Wound edges separating
  • Excessive scar formation: Thick, raised, or restricting scars
  • Delayed healing: No improvement after 10-14 days
  • Allergic reactions: Severe itching, rash, or swelling

Functional Red Flags:

  • Complete inability to move finger after week 1
  • Increasing stiffness despite therapy compliance
  • Return of triggering sensation
  • Severe pain that interferes with sleep beyond first week

When to Contact Your Healthcare Provider

Call Within 24 Hours:

  • Moderate increase in pain or swelling
  • Difficulty with prescribed exercises
  • Questions about wound care
  • Concerns about medication side effects

Call Immediately (or go to Emergency Room):

  • Any signs of infection
  • Severe, sudden onset pain
  • Complete loss of finger movement
  • Signs of allergic reaction
  • Chest pain or difficulty breathing (rare complications)

Professional Hand Therapy: Maximizing Your Recovery

Benefits of Certified Hand Therapy

Specialized Expertise: Certified Hand Therapists (CHT) possess advanced training in:

  • Anatomy and biomechanics of the hand
  • Post-surgical rehabilitation protocols
  • Custom splinting and orthotics
  • Advanced therapeutic techniques
  • Complication prevention and management

Evidence-Based Outcomes: Studies show patients who receive professional hand therapy demonstrate:

  • 25-40% faster recovery times
  • Better long-term functional outcomes
  • Lower complication rates
  • Higher patient satisfaction scores
  • Reduced risk of re-injury

What to Expect During Therapy Sessions

Initial Evaluation (Week 1-2):

  • Comprehensive assessment of range of motion
  • Strength testing (when appropriate)
  • Functional capacity evaluation
  • Pain and swelling assessment
  • Development of individualized treatment plan

Progressive Treatment Phases:

Phase 1 (Weeks 1-2): Protection and Early Mobility

  • Wound care education
  • Gentle range of motion exercises
  • Edema management techniques
  • Activity modification guidance

Phase 2 (Weeks 3-4): Strengthening and Function

  • Progressive resistance exercises
  • Functional activity training
  • Scar management techniques
  • Work hardening (if applicable)

Phase 3 (Weeks 5-6): Advanced Rehabilitation

  • Sport-specific training
  • High-level functional activities
  • Prevention strategies
  • Discharge planning

Choosing the Right Hand Therapist

Credentials to Look For:

  • CHT (Certified Hand Therapist) designation
  • OTR/L (Occupational Therapist) or PT (Physical Therapist) license
  • Experience with post-surgical hand rehabilitation
  • Positive patient reviews and outcomes

Questions to Ask:

  1. How many trigger finger release patients do you treat annually?
  2. What is your typical timeline for full recovery?
  3. Do you provide custom splinting if needed?
  4. How do you measure progress and outcomes?
  5. What is your communication process with my surgeon?
 Create a detailed infographic in 1536x1024 landscape format

Home Exercise Program and Self-Management

Essential Equipment for Home Therapy

Basic Supplies:

  • Therapy putty (various resistance levels)
  • Stress ball or grip strengthener
  • Rubber bands for extension exercises
  • Small objects for manipulation (coins, buttons, beans)
  • Measuring tape for tracking progress

Advanced Tools:

  • Paraffin bath for heat therapy
  • Compression gloves for swelling control
  • Finger extension splints (if recommended)
  • Digital goniometer for precise range of motion measurement

Daily Exercise Routine Template

Morning Routine (10-15 minutes):

  1. Warm-up with gentle finger flexion/extension (2 minutes)
  2. Tendon gliding exercises (5 repetitions each position)
  3. Individual finger isolation (10 repetitions per finger)
  4. Gentle stretching (hold 30 seconds each)

Afternoon Session (15-20 minutes):

  1. Heat application (5-10 minutes)
  2. Progressive strengthening exercises
  3. Functional activity practice
  4. Scar massage (if applicable)

Evening Routine (10 minutes):

  1. Range of motion review
  2. Gentle stretching
  3. Ice application (if swollen)
  4. Elevation during rest

Tracking Progress and Outcomes

Weekly Assessment Checklist:

  • [ ] Range of motion measurements
  • [ ] Pain level (0-10 scale)
  • [ ] Swelling assessment
  • [ ] Functional milestones achieved
  • [ ] Exercise compliance rate
  • [ ] Any concerns or setbacks

Progress Indicators:

  • Week 1: Gentle movement without severe pain
  • Week 2: 70% range of motion restored
  • Week 3: Light functional activities comfortable
  • Week 4: Near-normal grip strength
  • Week 5-6: Full functional capacity

Long-Term Prevention and Maintenance

Preventing Recurrence

Risk Factor Management:

  • Ergonomic improvements in workplace and home
  • Activity modification to reduce repetitive stress
  • Regular hand exercises to maintain flexibility
  • Early intervention for any triggering symptoms

Lifestyle Modifications:

  • Take frequent breaks during repetitive activities
  • Use proper grip techniques
  • Maintain overall hand and wrist flexibility
  • Address underlying conditions (diabetes, arthritis)

Maintenance Exercise Program

Daily Maintenance (5-10 minutes):

  1. Tendon gliding: 5 repetitions, 2 times daily
  2. Finger stretching: Hold 15-30 seconds each
  3. Grip strengthening: Light resistance, 10 repetitions
  4. Joint mobility: Gentle range of motion exercises

Weekly Intensive Session (20-30 minutes):

  • Progressive strengthening exercises
  • Endurance training
  • Functional activity challenges
  • Flexibility assessment and improvement

When to Seek Follow-Up Care

Routine Follow-Up:

  • 2-week post-operative visit
  • 6-week final assessment
  • 3-month functional evaluation
  • Annual check-ups (if risk factors present)

Urgent Follow-Up Needed:

  • Return of triggering symptoms
  • Persistent pain or stiffness
  • Functional limitations affecting daily life
  • New symptoms in other fingers

Nutrition and Healing Optimization

Anti-Inflammatory Diet Principles

Foods That Promote Healing:

  • Lean proteins: Support tissue repair and regeneration
  • Omega-3 rich fish: Reduce inflammation naturally
  • Colorful fruits and vegetables: Provide antioxidants and vitamins
  • Whole grains: Stable energy for healing processes
  • Adequate hydration: Essential for tissue health

Foods to Limit:

  • Processed foods high in trans fats
  • Excessive sugar and refined carbohydrates
  • Alcohol (can impair healing)
  • Foods high in sodium (can increase swelling)

Supplements for Recovery

Evidence-Based Options:

  • Vitamin C: 500-1000mg daily for collagen synthesis
  • Vitamin D: Supports bone and tissue health
  • Zinc: 15-30mg daily for wound healing
  • Protein powder: If dietary intake is insufficient
 Design a comprehensive infographic in 1536x1024 landscape f

⚠️ Important Note: Always consult with healthcare provider before starting any supplement regimen, especially if taking other medications.

Managing Pain and Discomfort

Medication Management

Over-the-Counter Options:

  • Acetaminophen: 650-1000mg every 6-8 hours (max 3000mg/day)
  • Ibuprofen: 400-600mg every 6-8 hours with food
  • Topical NSAIDs: Applied directly to affected area

Prescription Medications:

  • Short-term opioid pain relievers (if prescribed)
  • Stronger NSAIDs for severe inflammation
  • Muscle relaxants (rarely needed)

Non-Pharmaceutical Pain Management

Physical Techniques:

  • Heat therapy: Warm compresses before exercises
  • Cold therapy: Ice packs for acute pain and swelling
  • Gentle massage: Improves circulation and reduces tension
  • Elevation: Reduces throbbing and pressure

Mind-Body Approaches:

  • Deep breathing exercises: Activate body's relaxation response
  • Progressive muscle relaxation: Reduce overall tension
  • Mindfulness meditation: Improve pain tolerance
  • Distraction techniques: Engage in enjoyable activities

Special Considerations for Different Populations

Diabetic Patients

Enhanced Monitoring Required:

  • Slower healing times expected
  • Increased infection risk
  • Blood sugar control crucial for optimal healing
  • More frequent follow-up appointments needed

Modified Approach:

  • Extended therapy timeline (8-10 weeks)
  • Aggressive infection prevention measures
  • Careful wound monitoring
  • Coordination with endocrinologist

Athletes and High-Demand Workers

Sport-Specific Rehabilitation:

  • Progressive return to activity protocol
  • Sport-specific movement patterns
  • Performance testing before full return
  • Injury prevention strategies

Timeline Considerations:

  • May require 8-12 weeks for full competitive return
  • Gradual loading progression essential
  • Equipment modifications may be necessary
  • Long-term monitoring for recurrence

Elderly Patients

Age-Related Considerations:

  • Slower healing and recovery times
  • Multiple comorbidities may affect healing
  • Medication interactions more common
  • Fall prevention during recovery important

Modified Expectations:

  • Focus on functional goals rather than strength
  • Emphasis on safety and independence
  • Family involvement in care planning
  • Realistic timeline expectations

Technology and Recovery Tools

Digital Health Solutions

Mobile Apps for Hand Therapy:

  • Exercise reminder systems
  • Progress tracking capabilities
  • Video exercise demonstrations
  • Communication with therapy team

Wearable Technology:

  • Activity monitors for movement tracking
  • Smart compression devices
  • Temperature monitoring systems
  • Range of motion measurement tools

Telehealth and Remote Monitoring

Benefits of Virtual Care:

  • Reduced travel burden
  • More frequent check-ins possible
  • Access to specialist care
  • Cost-effective follow-up

Limitations to Consider:

  • Cannot replace hands-on assessment
  • Technology barriers for some patients
  • Limited ability to address complications
  • Insurance coverage variations

Cost Considerations and Insurance

Understanding Insurance Coverage

Typically Covered Services:

  • Initial surgeon consultation
  • Surgical procedure
  • Basic physical therapy (limited visits)
  • Follow-up appointments

Potential Out-of-Pocket Costs:

  • Extended therapy sessions
  • Specialized equipment
  • Custom splinting
  • Advanced treatment modalities

Maximizing Insurance Benefits

Documentation Requirements:

  • Medical necessity documentation
  • Progress notes from therapy
  • Functional outcome measures
  • Physician referrals and orders

Cost-Saving Strategies:

  • Use in-network providers
  • Understand visit limitations
  • Consider group therapy sessions
  • Explore community resources

Conclusion

The Hand-Therapy Roadmap After Trigger Finger Release represents a comprehensive approach to achieving optimal recovery outcomes. Success depends on understanding that surgery is just the beginning—the real work happens during the weeks that follow. By following the structured week-by-week progression, implementing proven swelling management techniques, and remaining vigilant for red-flag symptoms, patients can expect excellent functional outcomes.

Key success factors include:

🎯 Adherence to the progressive exercise program from day one through complete recovery 🎯 Proactive swelling management using evidence-based techniques 🎯 Professional guidance from certified hand therapists when possible 🎯 Early recognition of complications requiring medical attention 🎯 Long-term maintenance strategies to prevent recurrence

The journey from trigger finger release surgery to full functional recovery typically spans 6-8 weeks, but the investment in proper rehabilitation pays dividends for years to come. Patients who commit to structured therapy demonstrate superior outcomes, faster recovery times, and significantly lower rates of complications or recurrence.

Immediate Action Steps:

  1. Schedule your first therapy appointment within one week of surgery
  2. Gather necessary equipment for home exercise program
  3. Create a daily routine incorporating prescribed exercises
  4. Establish measurement systems to track progress
  5. Build a support network including healthcare providers and family

Remember that every patient's journey is unique, and flexibility within the structured approach allows for individualized care. When in doubt, always consult with your healthcare team rather than pushing through concerning symptoms. The goal is not just to recover, but to achieve optimal function that enhances quality of life for years to come.

With proper planning, dedication to the rehabilitation process, and appropriate professional guidance, trigger finger release surgery can provide lasting relief and restored hand function. The roadmap provided here serves as your guide, but the journey's success ultimately depends on your commitment to the process and partnership with your healthcare team.

August 8, 2025